BackyardRC
A practical approach to RC planes
Piper Cub Rat Rod Project Update
Posted by on May 13, 2015
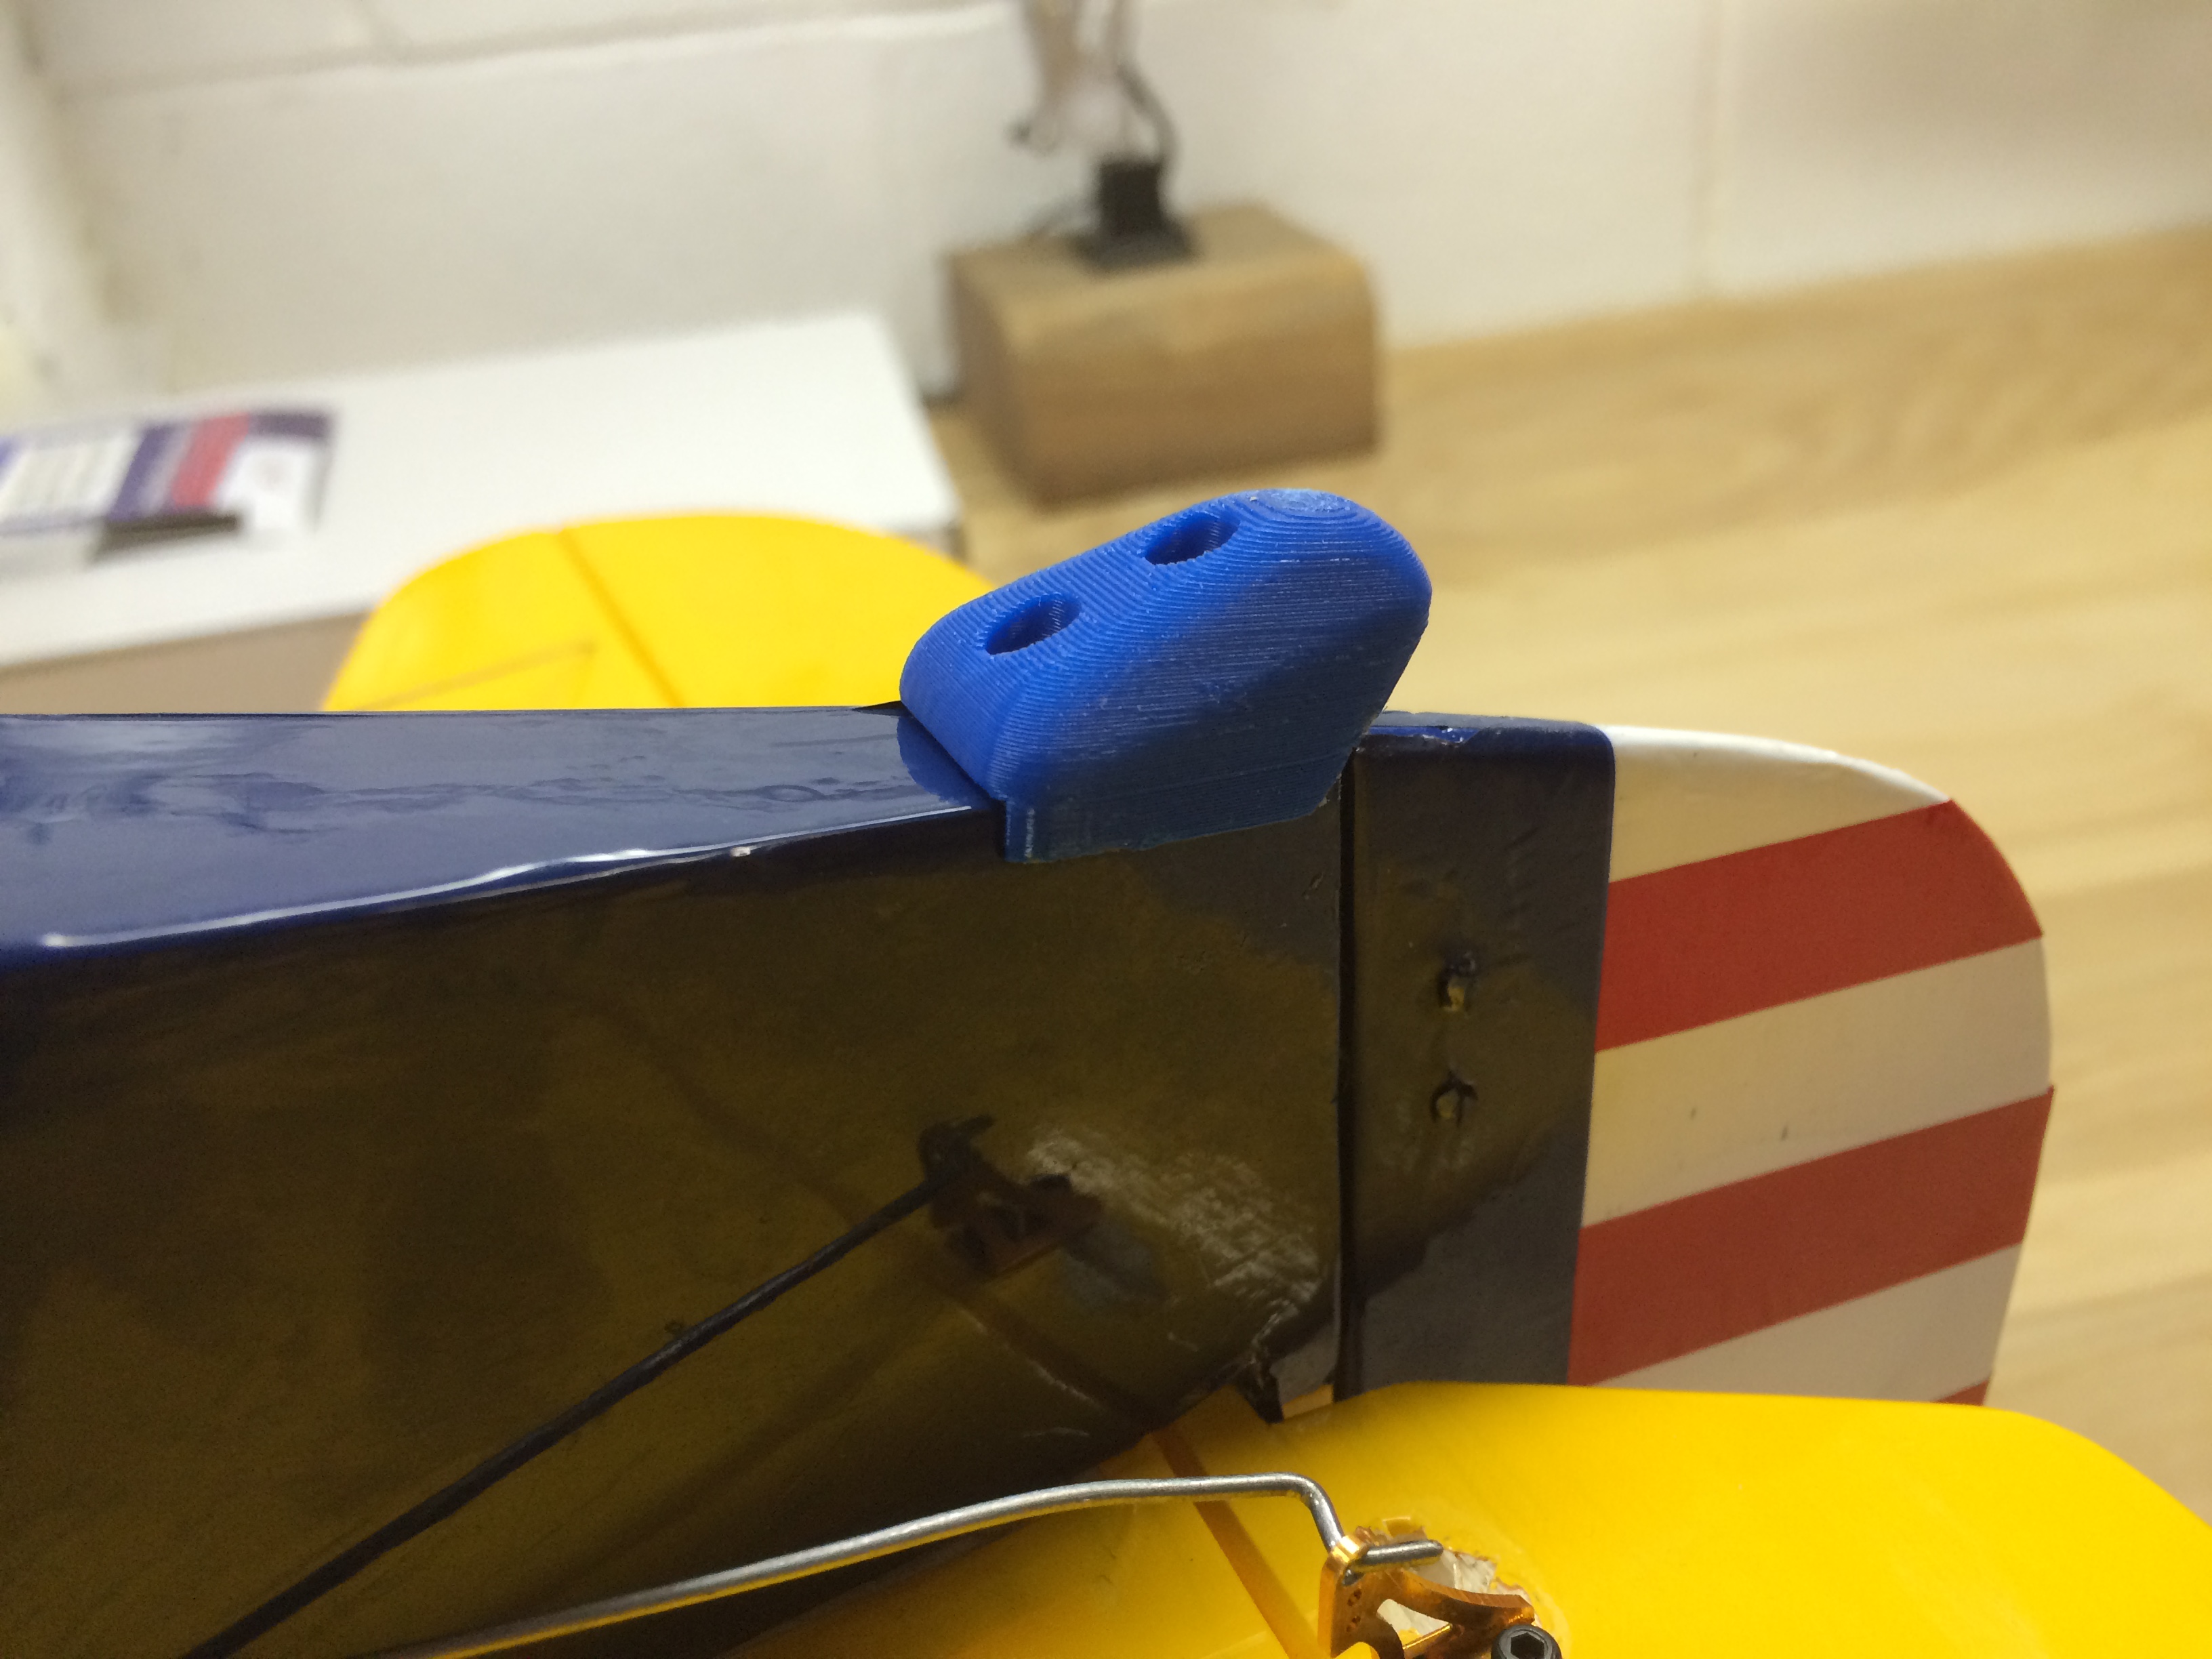
Simple tail skid for the Piper Cub
Last night I designed and printed a simple tail dragger skid plate for my Piper Cub. I believe it originally had a steerable tail wheel but an I will only be flying it off grass I though a simple skid will do the trick.

Small, light, and replaceable. Removes with just two screws!
The design lifts the tail just high enough so the rudder does not drag and mounts with two small screws. Print and CAD files are available over at thingiverse (http://www.thingiverse.com/thing:825070).

Works like a charm!
Thanks for reading!
-Miles
Giant Lego Figs
Posted by on May 12, 2015

Giant Lego Figs!!!
Over the past few days I have been printing Giant Lego Figs for my stepson and his cousins. They turned out super cool and I had to share! There is a small community of designers making new parts for the giant fig and all the STL files I used were downloaded from Thingiverse.com.

Base model: http://www.thingiverse.com/thing:170076
I would recommend printing everything at 100% infill. These guys take a beating from the boys but keep going! (I had started out with a few that were 35% infill and they kept breaking at the neck… no one wants a Lego guy without a head!)

Along with the base fig there are a ton of add-ons and mods out there. I’ve printed a few already including Batman, Superman, and astronaut/scuba diver.

Batman Cloak Turned out Awesome!
In addition there are others like Darth Vader and Yoda. Tons of extras like mohawks and cameras.

Oxygen Tanks and Helmet: http://www.thingiverse.com/thing:654286
I hope you enjoy these as much as the kids and I do!! Download and print some yourself. Post a comment and let us know how they turned out!
-Miles
Rat Rods of the Sky
Posted by on May 10, 2015

The Rat Rod look has been around for a long time… but can it be applied to an RC plane?
Over the past 10-15 years there has been a new cool in hot rod cars. The rat rod. This style of hot rod or custom car imitates (or exaggerates) the early hot rods of the 1940s, 1950s, and early-1960s can be characterized by some as mobile junk. Most rat rods appear “unfinished”, regardless of their status, as only the vehicle’s bare essentials are driven. I for one love the rat rod look, culture, and ethos. Start with an old shell of a car from 70 years ago and do the bare minimal to get it up and running. While repairing, the goal isn’t perfection or even finding the right part but often simply using what you have in a creative way. And this all begs the question for me. Can’t this be applied to RC planes? I am a member of my local AMA RC Club (Keystone Radio Control Society) and we have a table at our field where anyone can drop off old used RC parts, planes, gadgets for the next guy to pick up for free. And lately there have been a number of damaged planes dropped off. Often crashed, stripped of all useful parts, and given up on by the previous owner. This is where my idea of Rat Rods of the Sky comes in. I’ve been picking up these old vintage (and some not so vintage) wrecks, piecing them together with whatever I have lying around the shop, and then flying the tar out of them. This past week I found slightly used Piper Cub (I think J3 but correct me if I am wrong). It had just a few minor dings and dents, a few holes in the monokote, and was missing the servos and motor. Oh yeah and it had been nosed in at a good rate of speed and the whole nose was smashed to bits. But the wing was in good shape. The tail straight and solid. A perfect rat rod candidate. So I took my new patient home to the shop for some much needed surgery.

Piper Cub Rat Rod Starter Kit
The first order of business was simply assessing the damage and stabilizing the nose. I simply took all the smashed balsa and recreated what I could like jigsaw puzzle of tooth picks and kindling. By the time I had glued a few sections back together the nose was solid and straight. Ugly yes, but a good foundation to build upon.
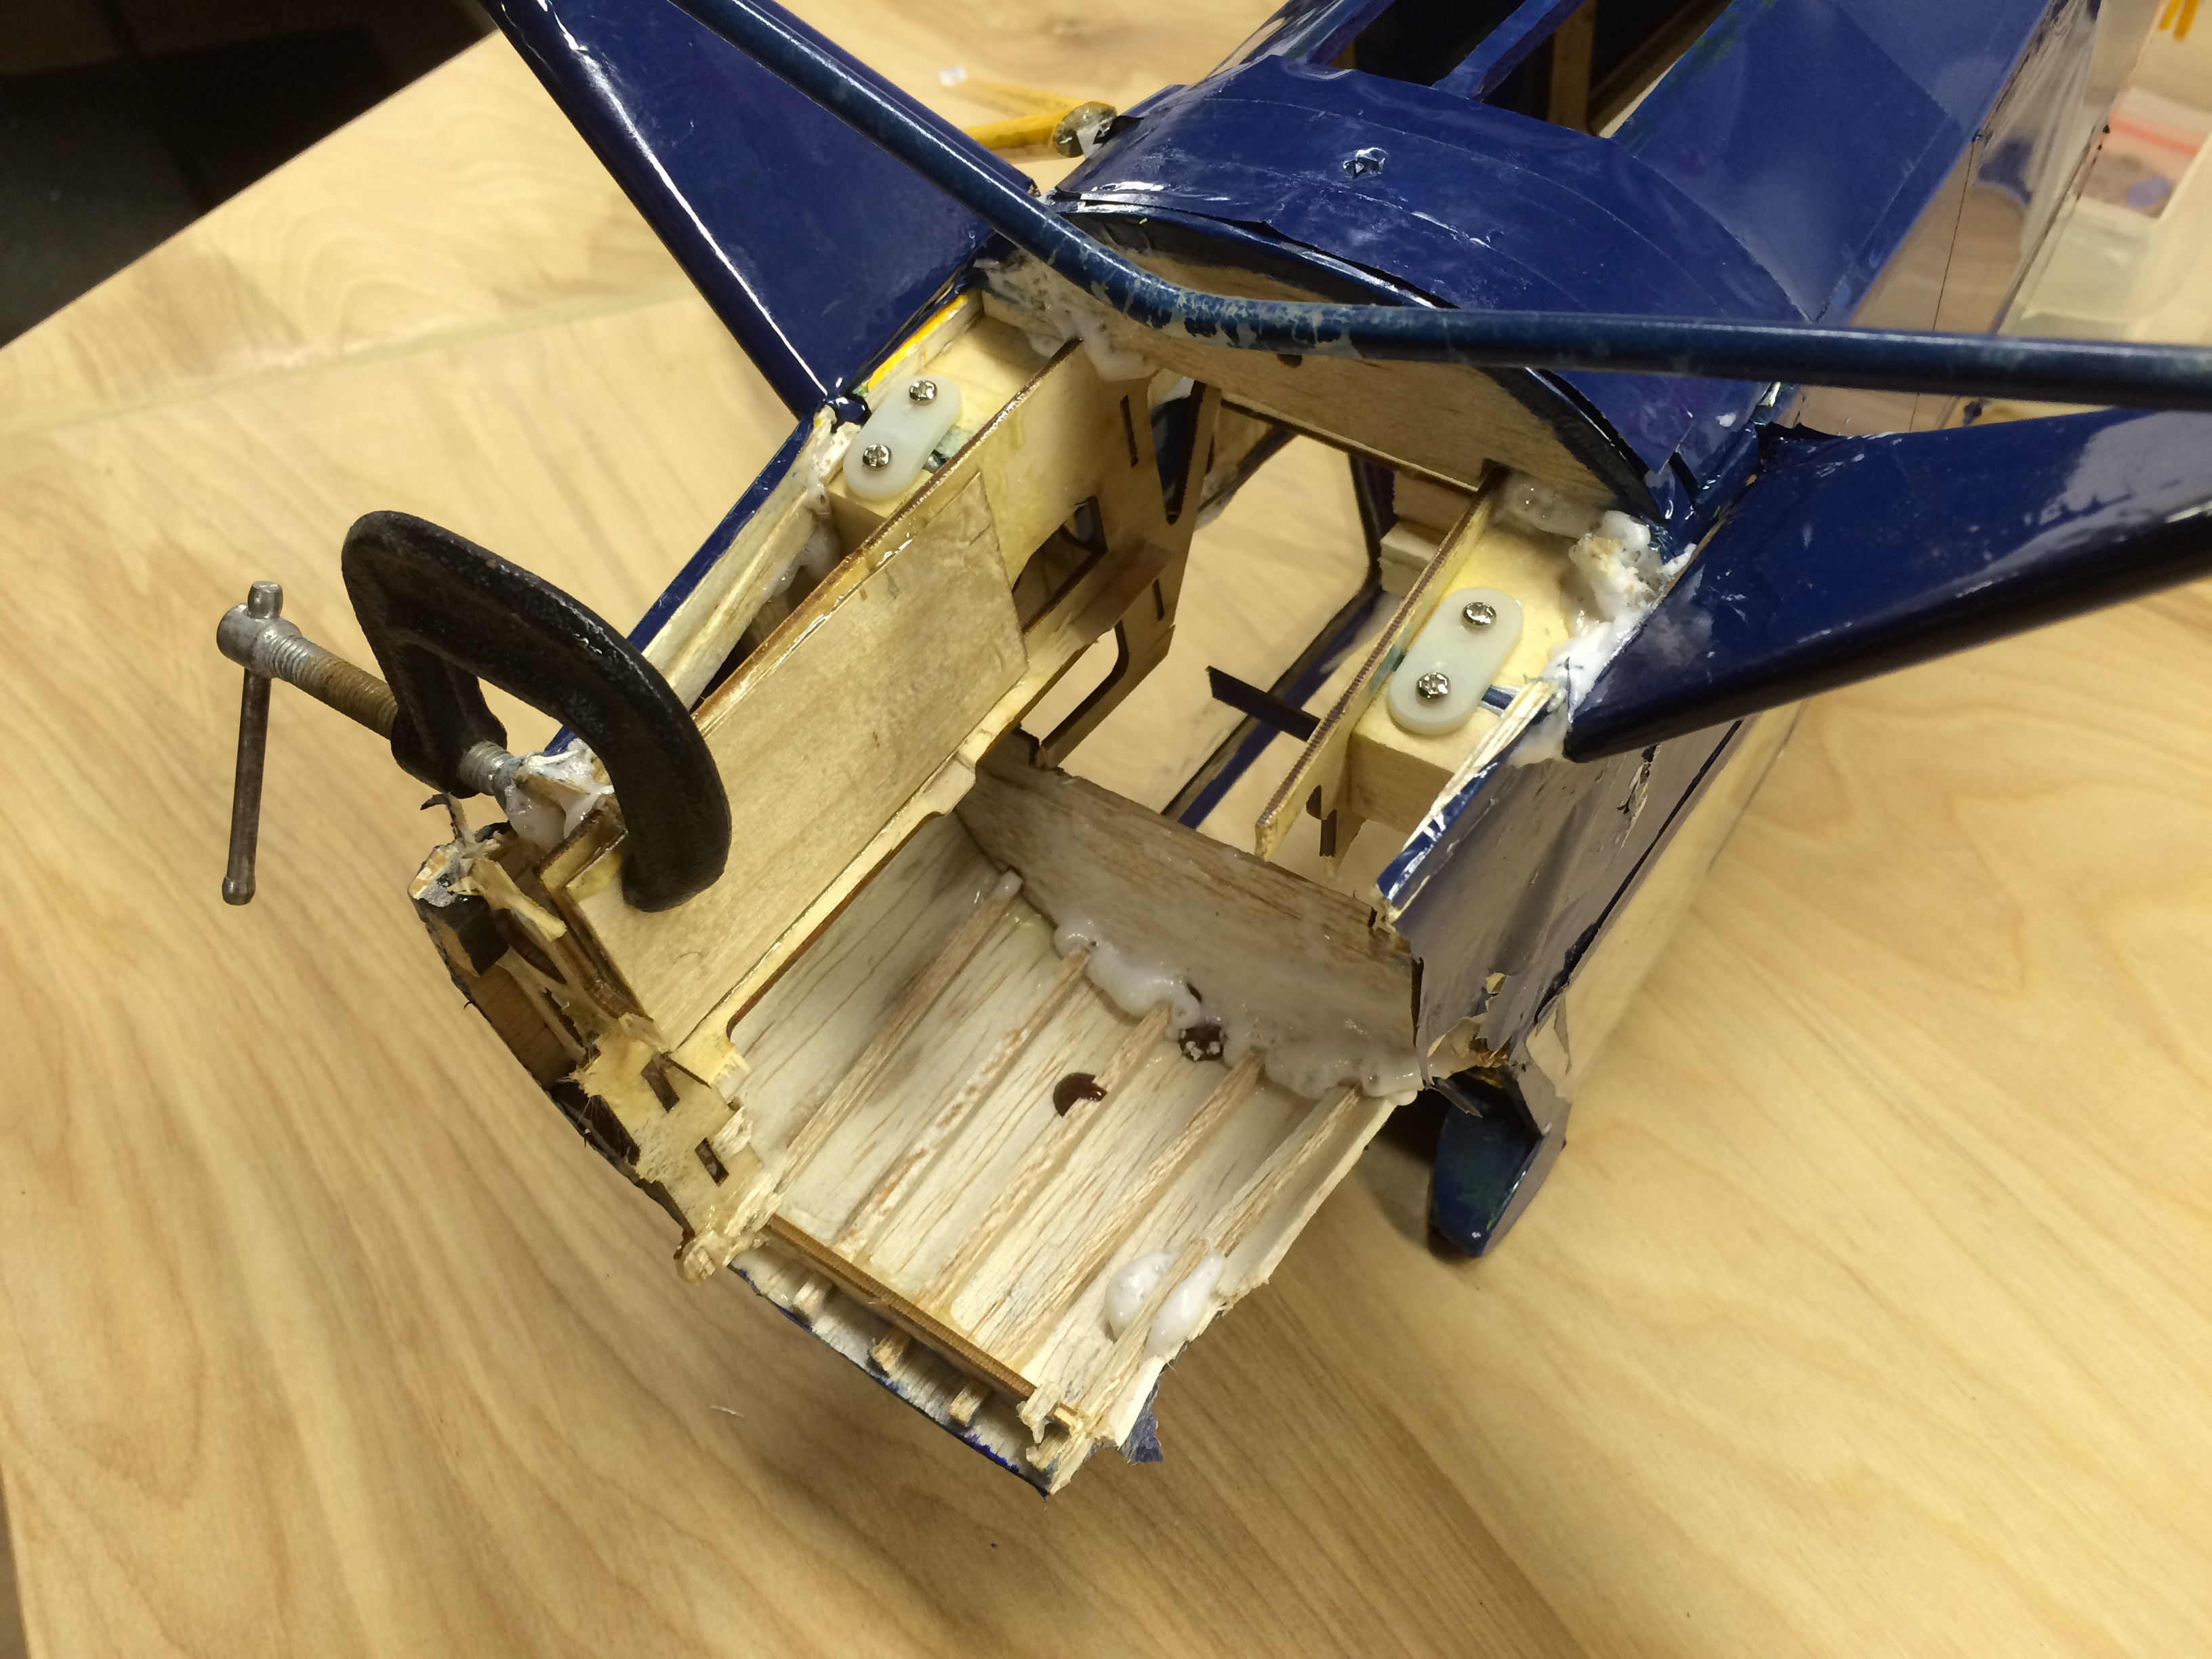
Nothing a little guess can’t fix

It’s nothing more than a jigsaw puzzle!
The next order of business was to start planning the conversion to electric. I knew I needed to find an easy way to load and unload a battery, mount the motor, and all while working toward a proper center of gravity. I have a bunch of old DT750’s around from my first tricopter build back in 2013. These cheap bell style motors with there long shaft, wide mounting plate, and efficiency on a 10×3.5 slow fly prop made it the perfect candidate for the conversion. Being significantly lighter than any nitro or gas motor that was previously in this plane I new I needed to more the motor as forward as I could and then balance the plane with the correct battery placement. Using some old 3/4 wood booms (also off my old tricopter) I built a frame to strengthen the nose. The large booms also helped sneak much needed nose weight up front.
Subframe Goodness

The new subframe and firewall are rock solid
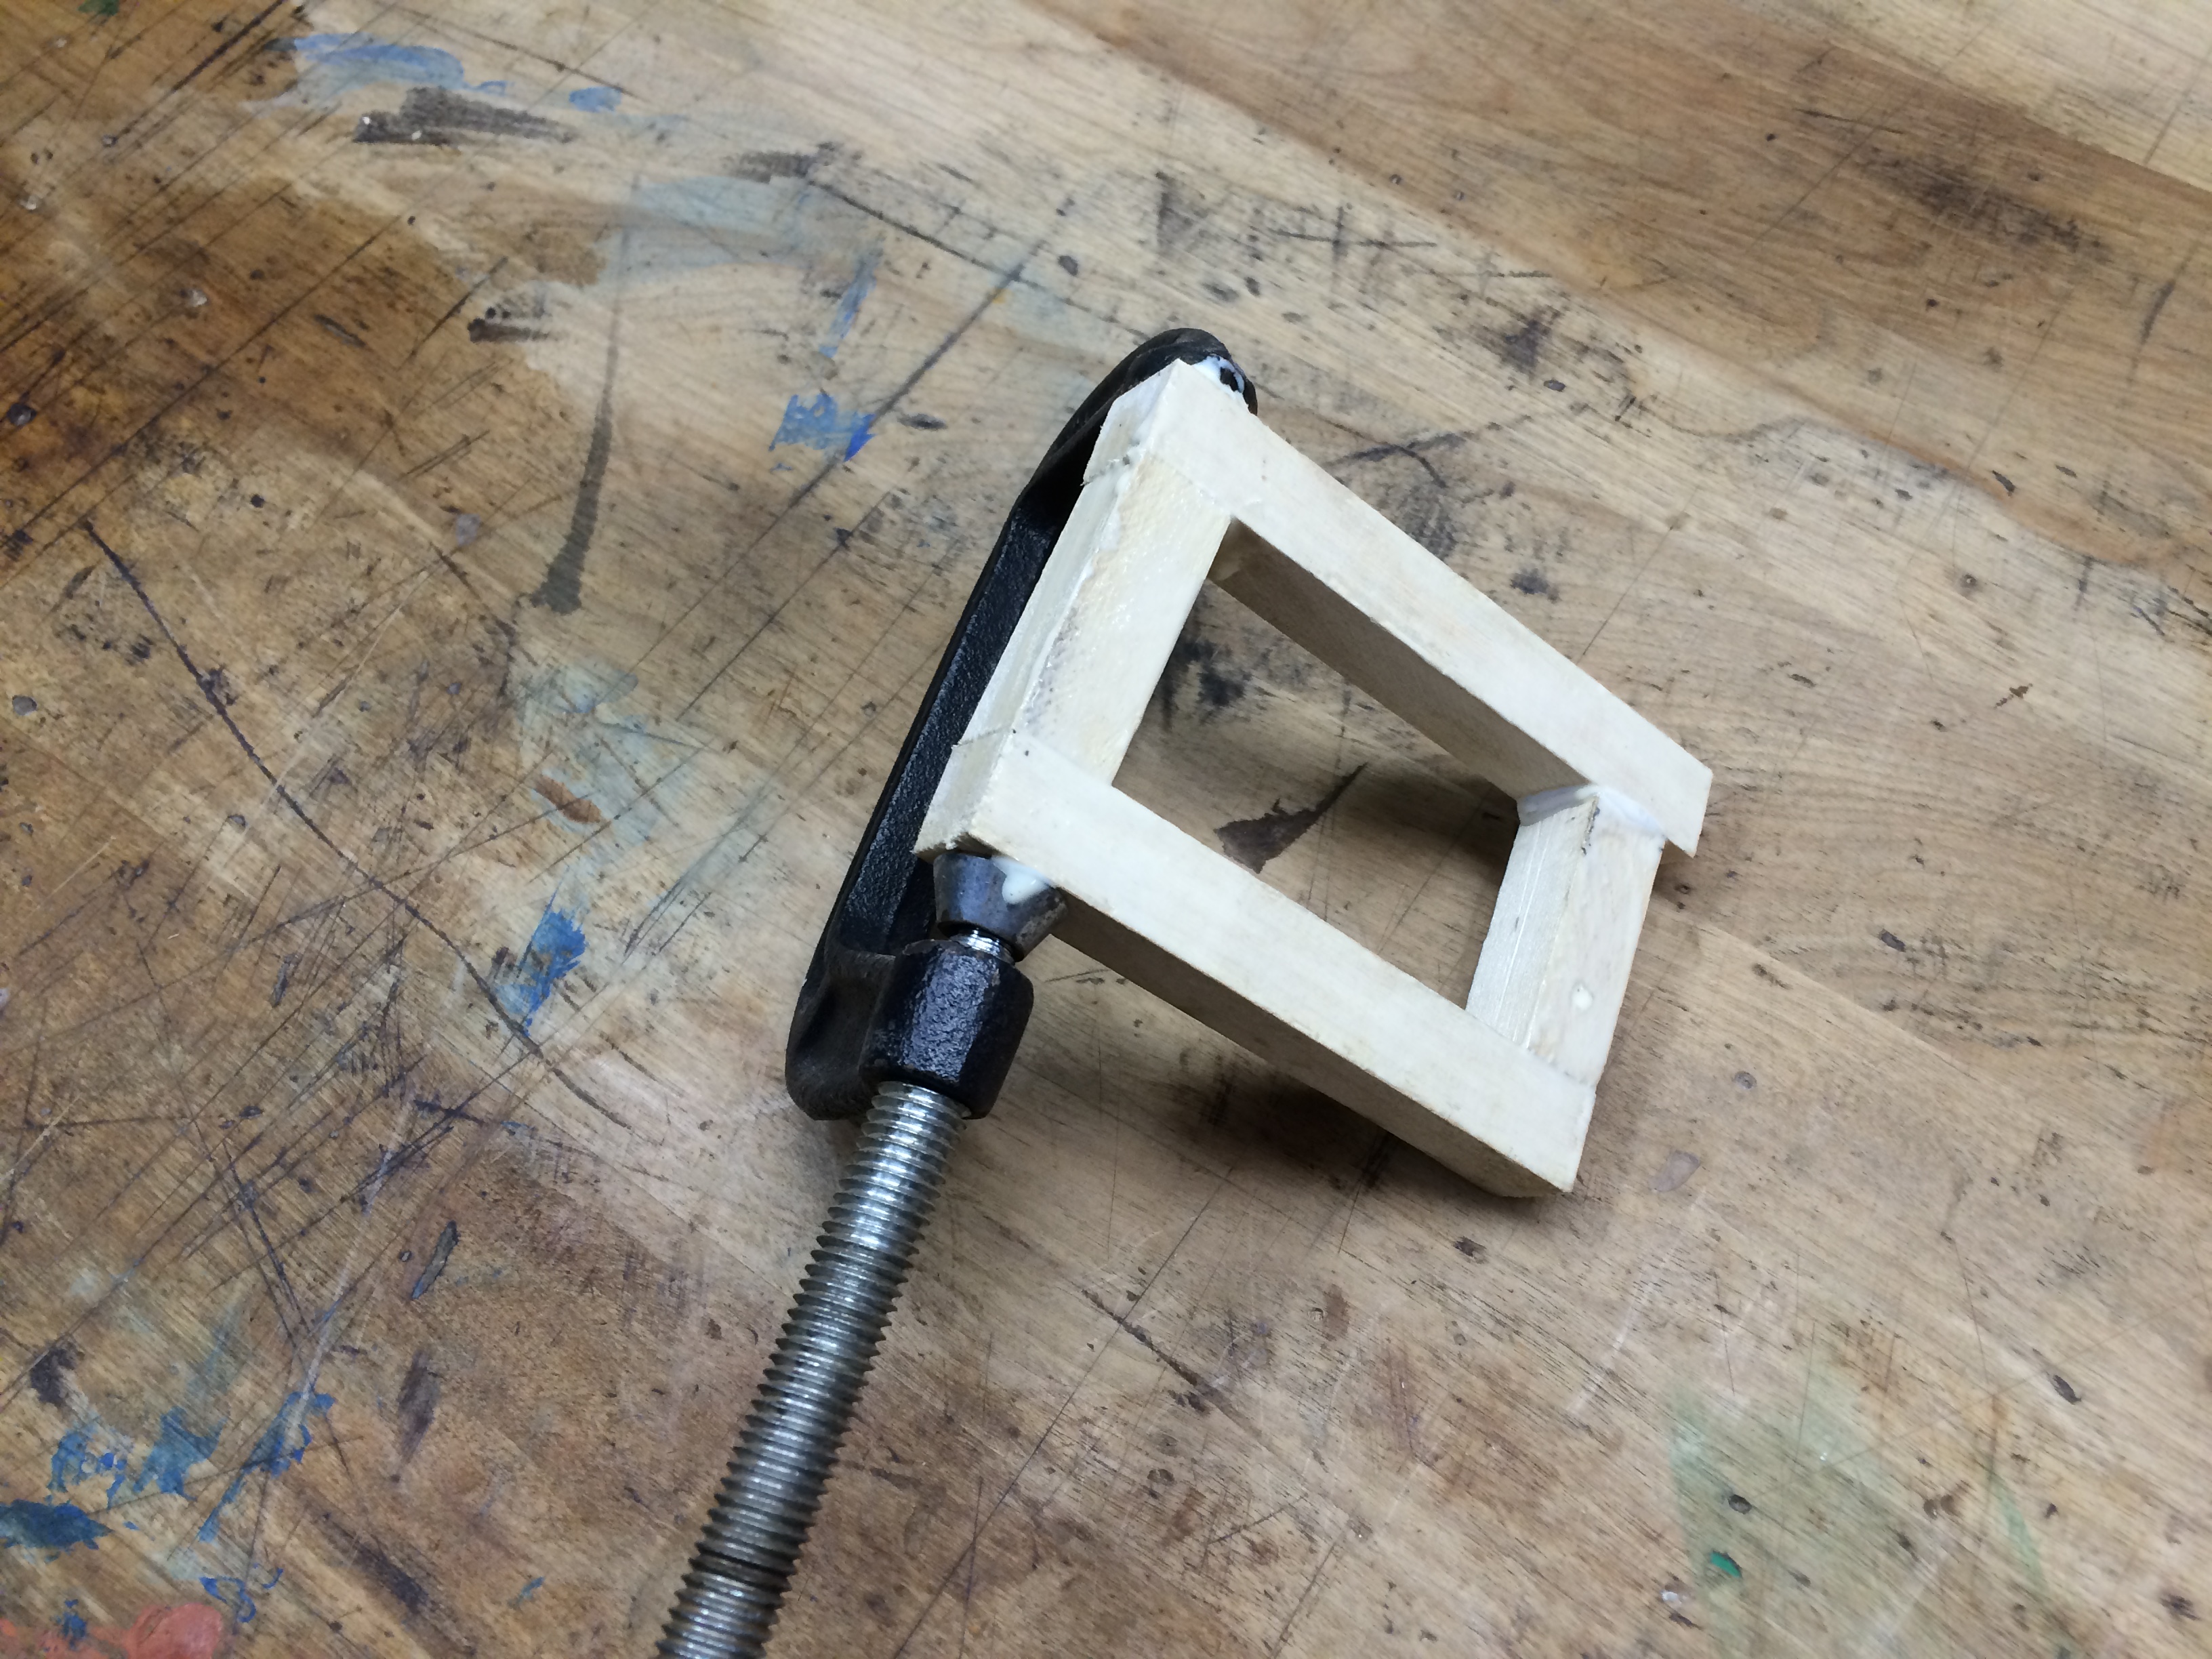
Once the subframe was glued in I hand cut a firewall and deck for the battery to Velcro to.

Battery Tray
At this point the airframe is rock solid and more or less complete. Yes it’s not beautiful, but it is functional. Any more work to the fuselage would just diminish the character of this old bird. To mount up the DT 750 I decided to go modern and 3D print a mount.
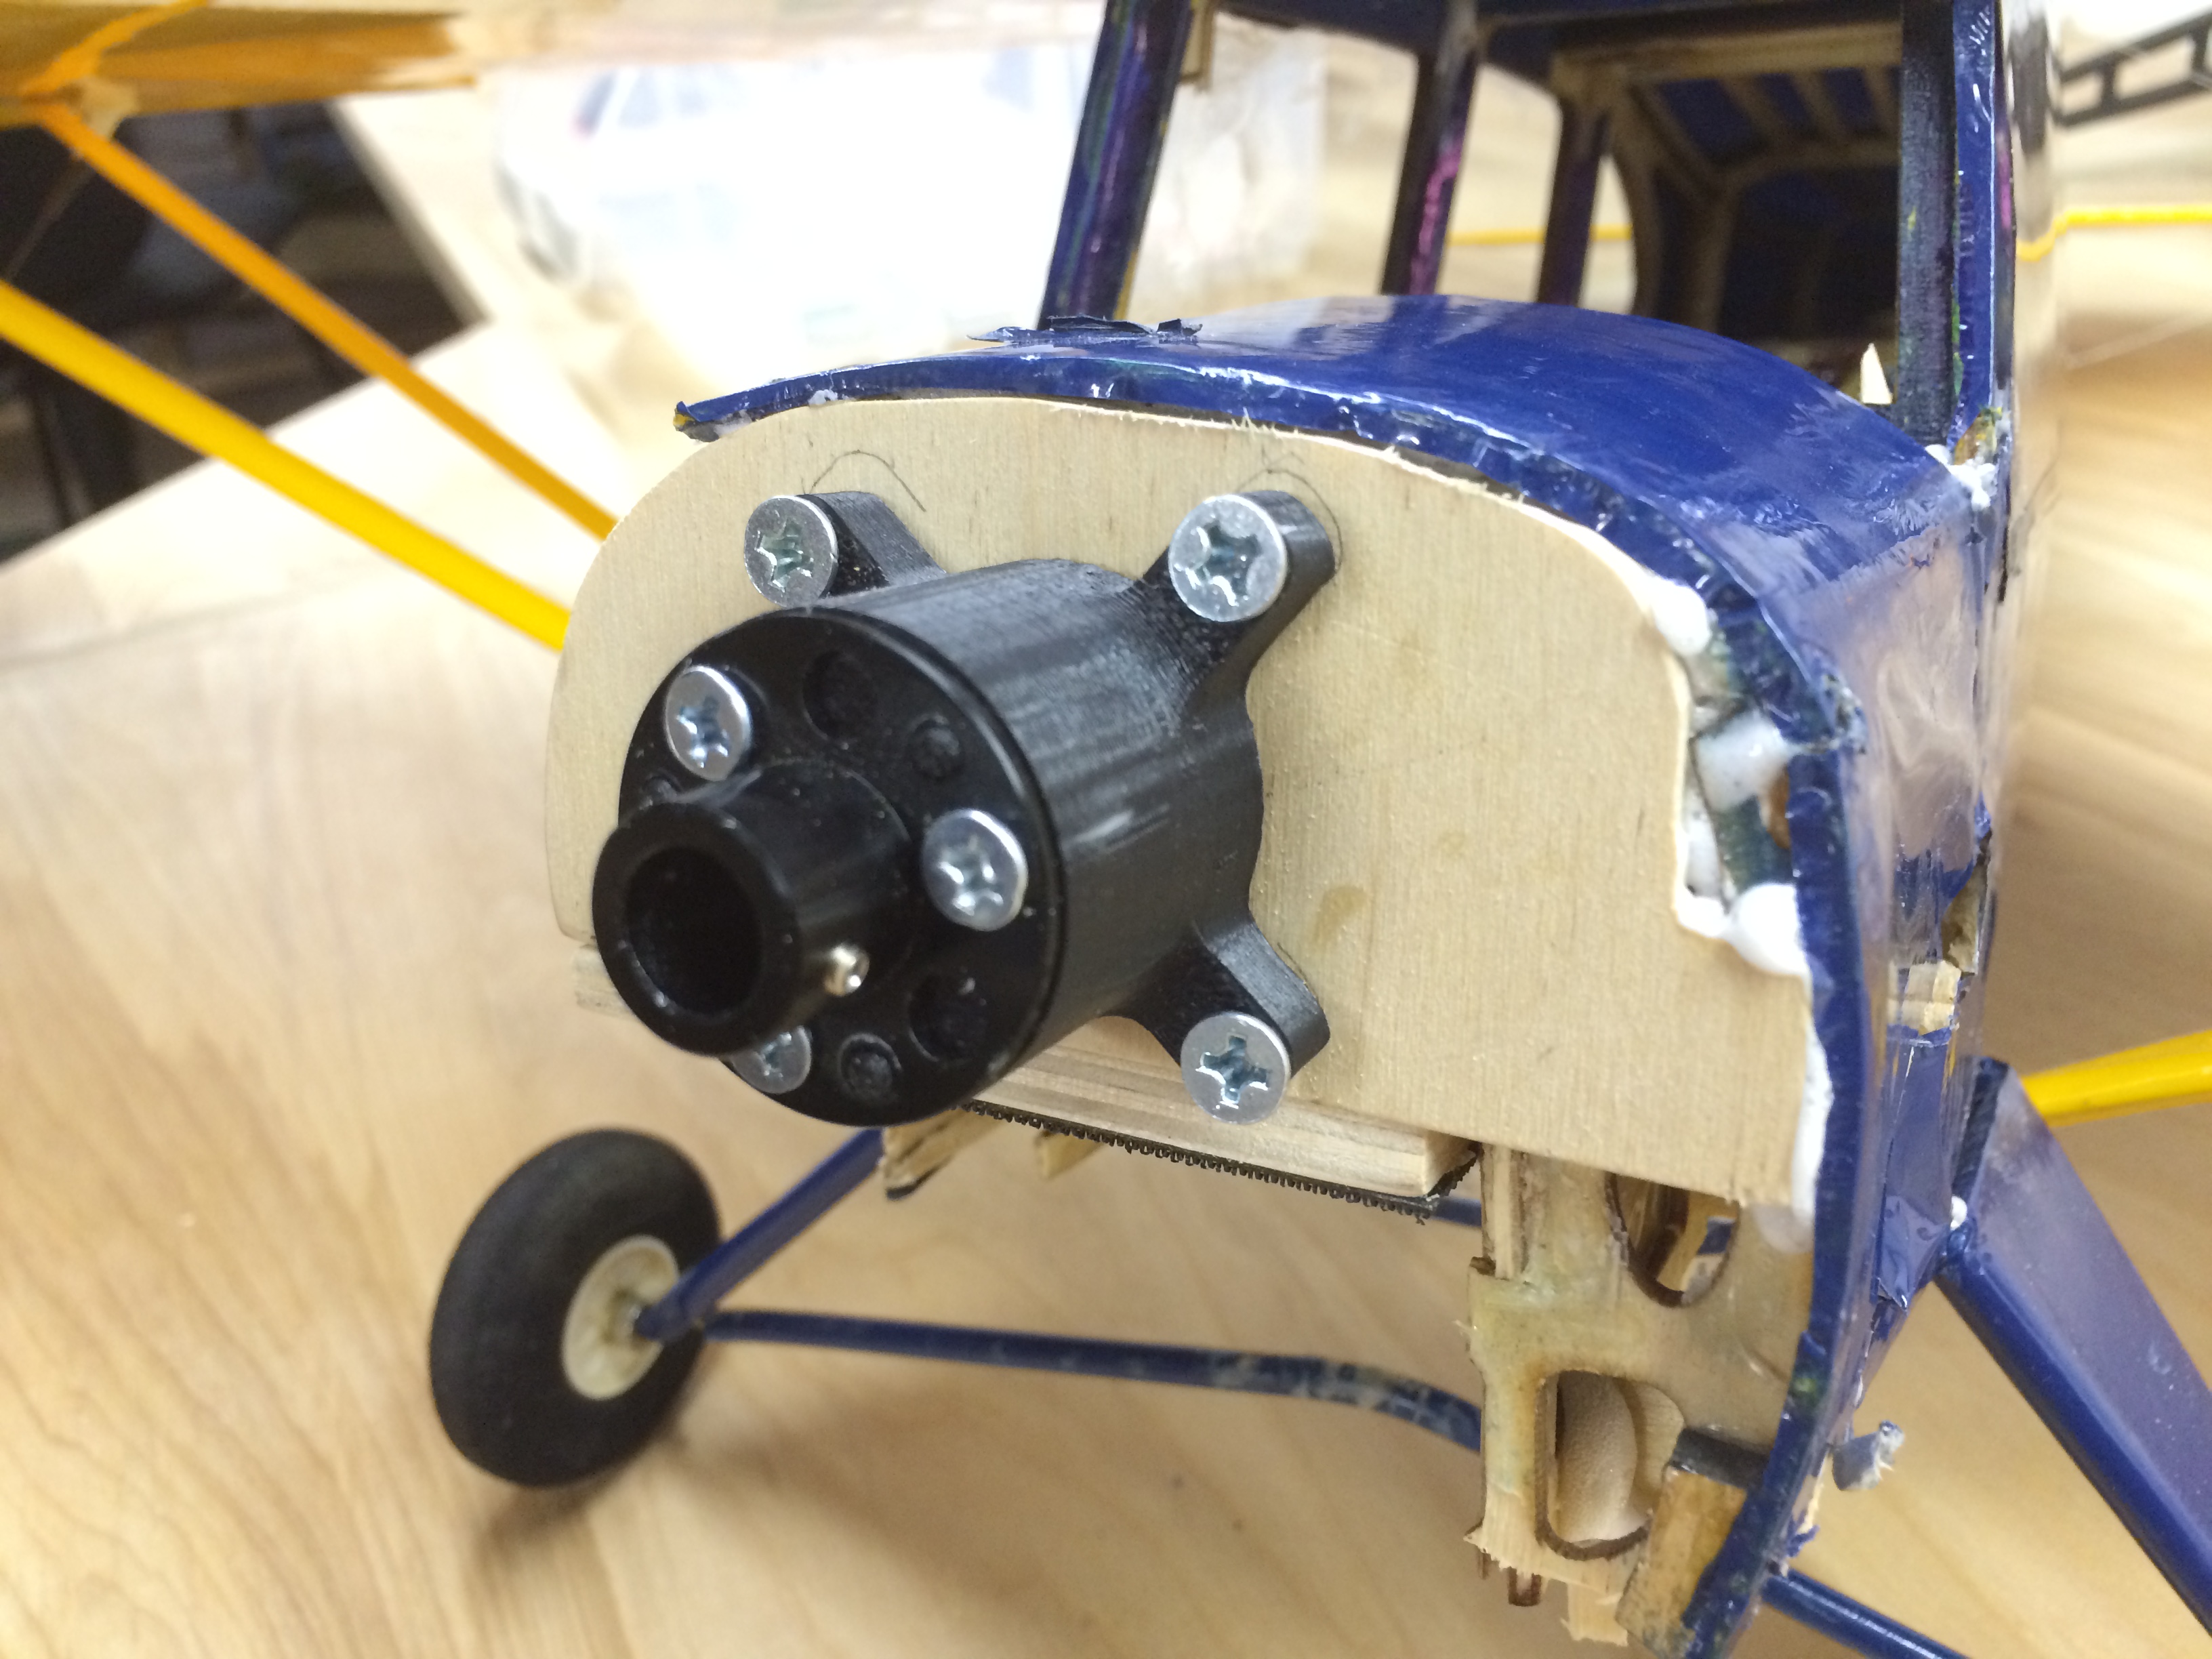
3D printed DT750 motor mount
3D printing had become such a staple for me in any mounting of motors. 15 minutes of CAD design and I have the perfect alignment and placement of the motor. It lines up centered in the cowling, perfectly aligns with the center line of the plane, and has the perfect offset. If you would like a copy of this mount for yourself you can find the print files over at thingiverse.com or you can order a print from me over at 3DHubs.com.

Download the CAD and STL files over at Thingiverse
At this point I’m well on the way to having the Piper Cub Rat Rod flying be the weekend. But there is one hold up: I am out of stock of spare servos. Guess I have been building too much this winter. So until my HK order arrives the Piper will be hanging out on the bench.

Piper Cub Rat Rod
Let’s hope the servos come before the weekend! I’m dying to fly my new plane! Thanks, Miles
Happy Mother’s Day!
Posted by on May 10, 2015
Good Morning and Happy Mother’s Day Everyone!
Its a the beginning of a new flying season here in the North East. Well really my season hasn’t really ever ended. I fought the cold and snow as much as I could this year and at least got out and flew something once a month. But now the weather is perfect. Early May in Pennsylvania is beautiful. All the plants are starting to grown, the green is coming back into everything, and the grass grows feet per week.
With all the new growth and the new season I thought I should dive back into my lonely old blog. Over the past two years I’ve posted just over 75 write ups and slowly have been gaining followers. The dormant blog has steadily getting 20-25 hits a day. Not too bad for a not so often updated blog about RC. I hope to keep a nice steady pace through this flying season as well. I hope to share, inform, and entertain you with an insight into my experiences with RC flight. So please stay tuned! I’ve got lots of great projects in the works, new stories to share, and plenty of opinions I’m sure your dying to hear 😉
And it would be right if I didn’t add HAPPY MOTHER’S DAY MOM! I wouldn’t be where I am today if it wasn’t for you and all of your love and support of the years! Best mom ever! Love you!
Thanks!
Miles
To tilt or not to tilt… not even a question
Posted by on November 8, 2014

Nick’s 300mm MiniTri Tilt Mounts!
The 3D printer has been working hard this week. A new batch of tricopter tilt mounts are on their way to Nick!!
Saturday Fun – What is lost will be found!
Posted by on November 8, 2014
Today I met Ray early and we headed to Creamery Field. We rolled in about 8AM and were the only ones braving the cold. Ray was flying his Archer for the first time since a bad hand launch left it needing repairs. With a newly upgraded with a new Mass Airscrew prop it handled great. We each burned a battery on the archer before I took up the Twinstar and we flew together.
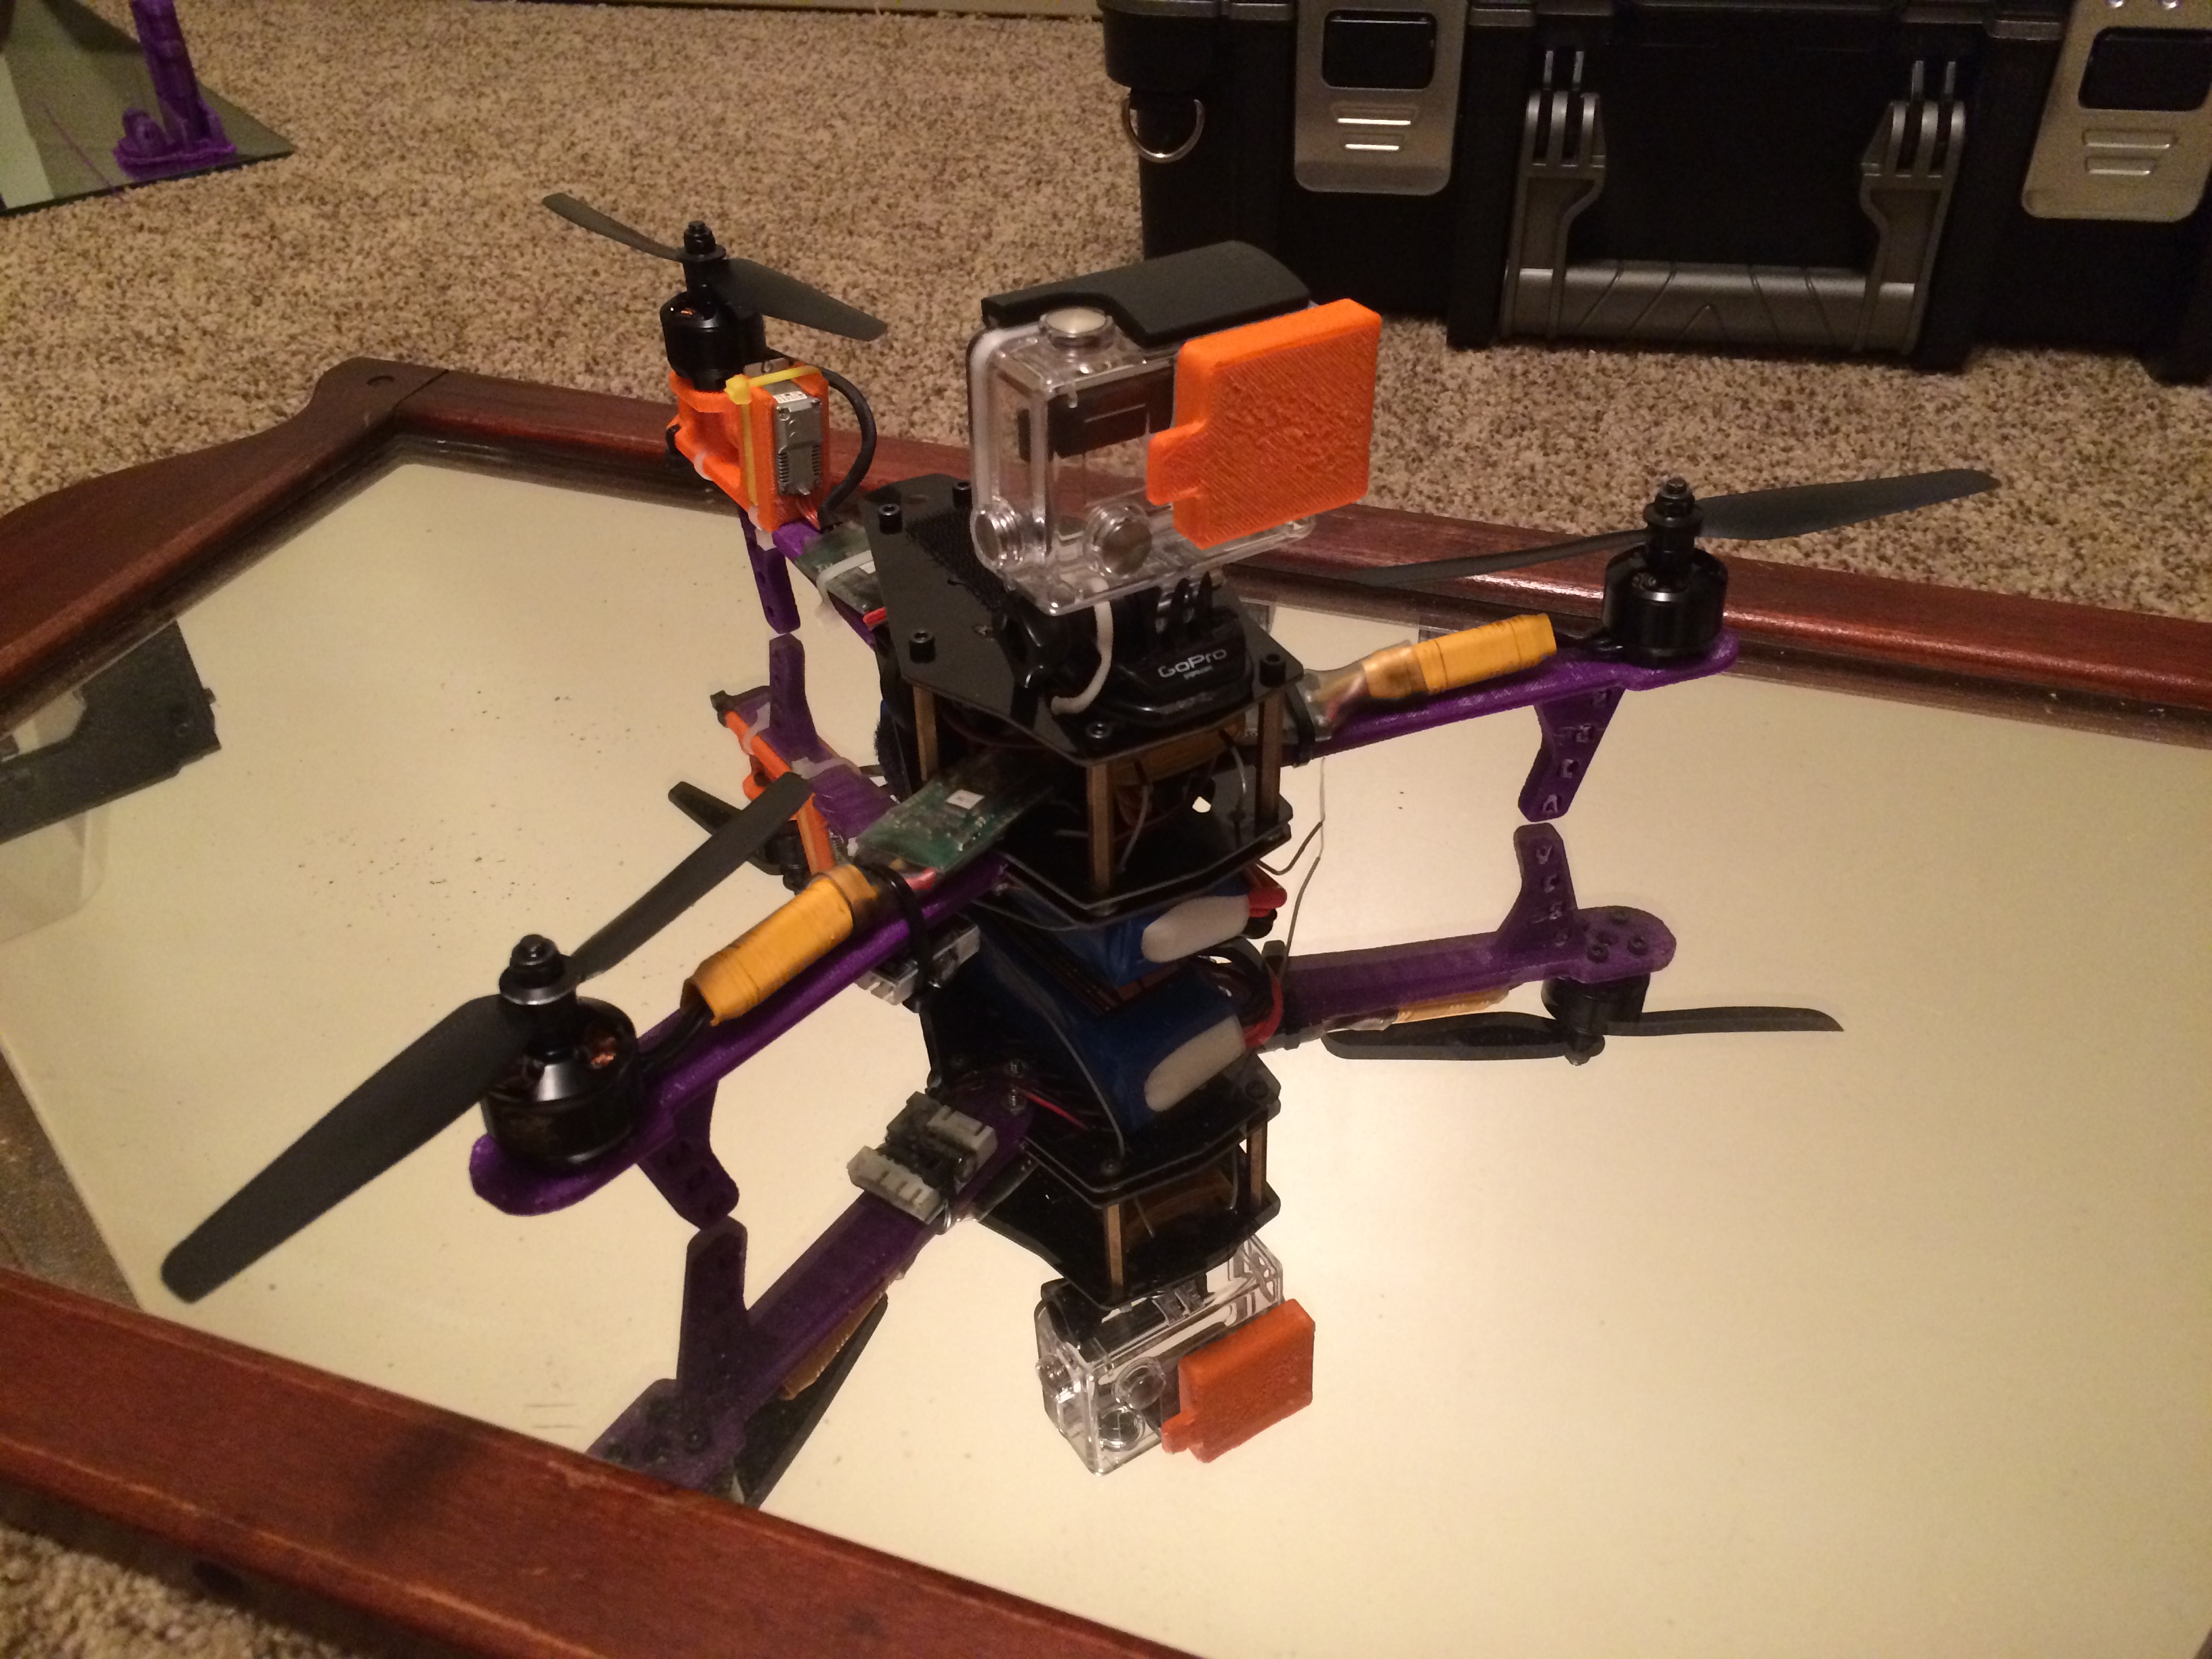
Nick’s 300mm MiniTri
After that I took our my new MiniTri based on Nick’s kit. Our friend Chris lost a plane in the corn field back in mid summer and we thought now that the corn was brown we might find it. So I flue a nice slow pattern back and forth over where we thought it was. We didn’t see it on the video monitor or goggles but it was a good test run for the range and power of the tri.
By then we were getting cold (it was only about 35 this morning). So we headed for coffee and a review of the video on a computer screen. All caffeinated, warm, and still with no luck we headed back to the field once more. To our amazement we were still the only ones there. So we decided to take a quick walk into the corn. While we were there we could hear the corn combine in the field next to where the plane was. So we knew this might be the last change to find it. And after 10 minutes we found it! And in great shape too!

Chris’ Stingray found after 3 months in the corn!
Happy with our find we headed back to the flight line and burned a few more batteries as the wind picked up.
While putting Chris recovered plane in the clubhouse I sifted through the freebee pile and found a gem. A well loved old balsa low wing plane. All the electronics and the motor were pulled but the overall air frame is in great shape. So I took home a new project.

A well loved balsa plane needs some love to get her back up in the air…
Overall not a bad day. MiniTri FPV, one found plane, one new project, and a bunch of great flights!
Can’t wait to wake up again tomorrow and do it all again 🙂
-Miles
MiniTri Speed Tests
Posted by on November 5, 2014
Today I skipped out of work 30 minutes early to beat the sundown and run some MiniTri speed tests. I’ve been tuning the PIDs and tweaking the setup for about two weeks on and off. I think I have it dialed in fairly well. I’m still having some minor issues were the Tri over corrects for the weight of the go-pro and pitches. It most often happens when the craft is changing speed.
But overall the trip is flying really well. It’s hard to judge the speed from the video but it is quick. I have been flying a set of GWS 6×3 props and I have not had much luck with them. At high RPMs I get some nasty vibration sounds and fear I’m about to shatter the prop. So in the video above I only hit about 75% throttle.
If anyone out there knows of a good set of 6×3 props please let me know! I am not planning on purchasing the 6×3 GWS props again. Which is funny because the 5×3 GWS props on the Blackout are great! I have yet to have a problem with them.
Anyway I had fun burning through two quick batteries and I hope you enjoy watching the results!
-Miles
MiniTri First Flights
Posted by on October 21, 2014

MiniTri Build Completed
Last week before my business trip I finished up the MiniTri and started tuning the PIDs. And I have to say this thing is ballistic! I started out with the default tricopter settings from OpenPilot. With a few short line of sight flights I started working out the shakes and wobbles. After the second battery I started to feel good about the setup. So I started to test the speed. In the 100 x 100 foot back yard I couldn’t get the tri to full tilt. This thing rockets to high-speed and just keeps going. I would have to guess that it would top out around 45 mph! And this is only on a 3-cell! The equipment should handle a four without issue!
I am was having a blast whipping the tri from one end of the yard and back. The controls were smooth and the flight steady. But then something started to act funny. The tri would yaw and not stop. I tried to bring it back around but I ended up tagging a block wall a 25 mph. So I also got to test the strength of the frame. Not my intentions but it does help illustrate the awesomeness of the frame. A hit of this magnitude would have crushed any quad out on the market and forget the death and distraction an RC plane would have shown. The MiniTri frame held up very well. I did crack one of the front arms just inside of the motor mount but really I expected the whole frame to be shattered. After a quick email to Nick and a new arm in the mail, it only took me 4 minutes to have the tri repaired.

Servo Surgery
But I do want to loop back around to why the tri yawed out of control. In my haste to build and test I used a used servo that had been on one of my full-sized tricopter. This tricopter just happened to have a tangle with a tree. Therefore I’m guessing that the servo gear had already been damaged and the few flights on the MiniTri finished it off.

Missing tooth on the yaw servo main gear
Taking apart the servo confirmed what I had thought. The main gear was missing a tooth. The good news is that HobbyKing sells replacement gears for $3. The bad news is that they are only on the international warehouse and it will be 3-4 weeks until they get here… So until then the MiniTri is on hold.
I can’t wait to get some FPV gear on and really start to put the tri through its paces. The first few flights were such a teaser and I was very pleased with the results. Now I’m just left itching for more. But until the parts come in I’ll have to work on some other projects.
– Miles
MiniTri Build – Part 2
Posted by on October 13, 2014

MiniTri Build Begins!
A few weeks ago I but together a prototype frame kit from Nick Caldwell. This week I finally got all the electronics in and started the build. In today’s post I’ll run through some of the main points of the build, give a parts list, and give a bit of my reaction to the new kit. So let’s get started.
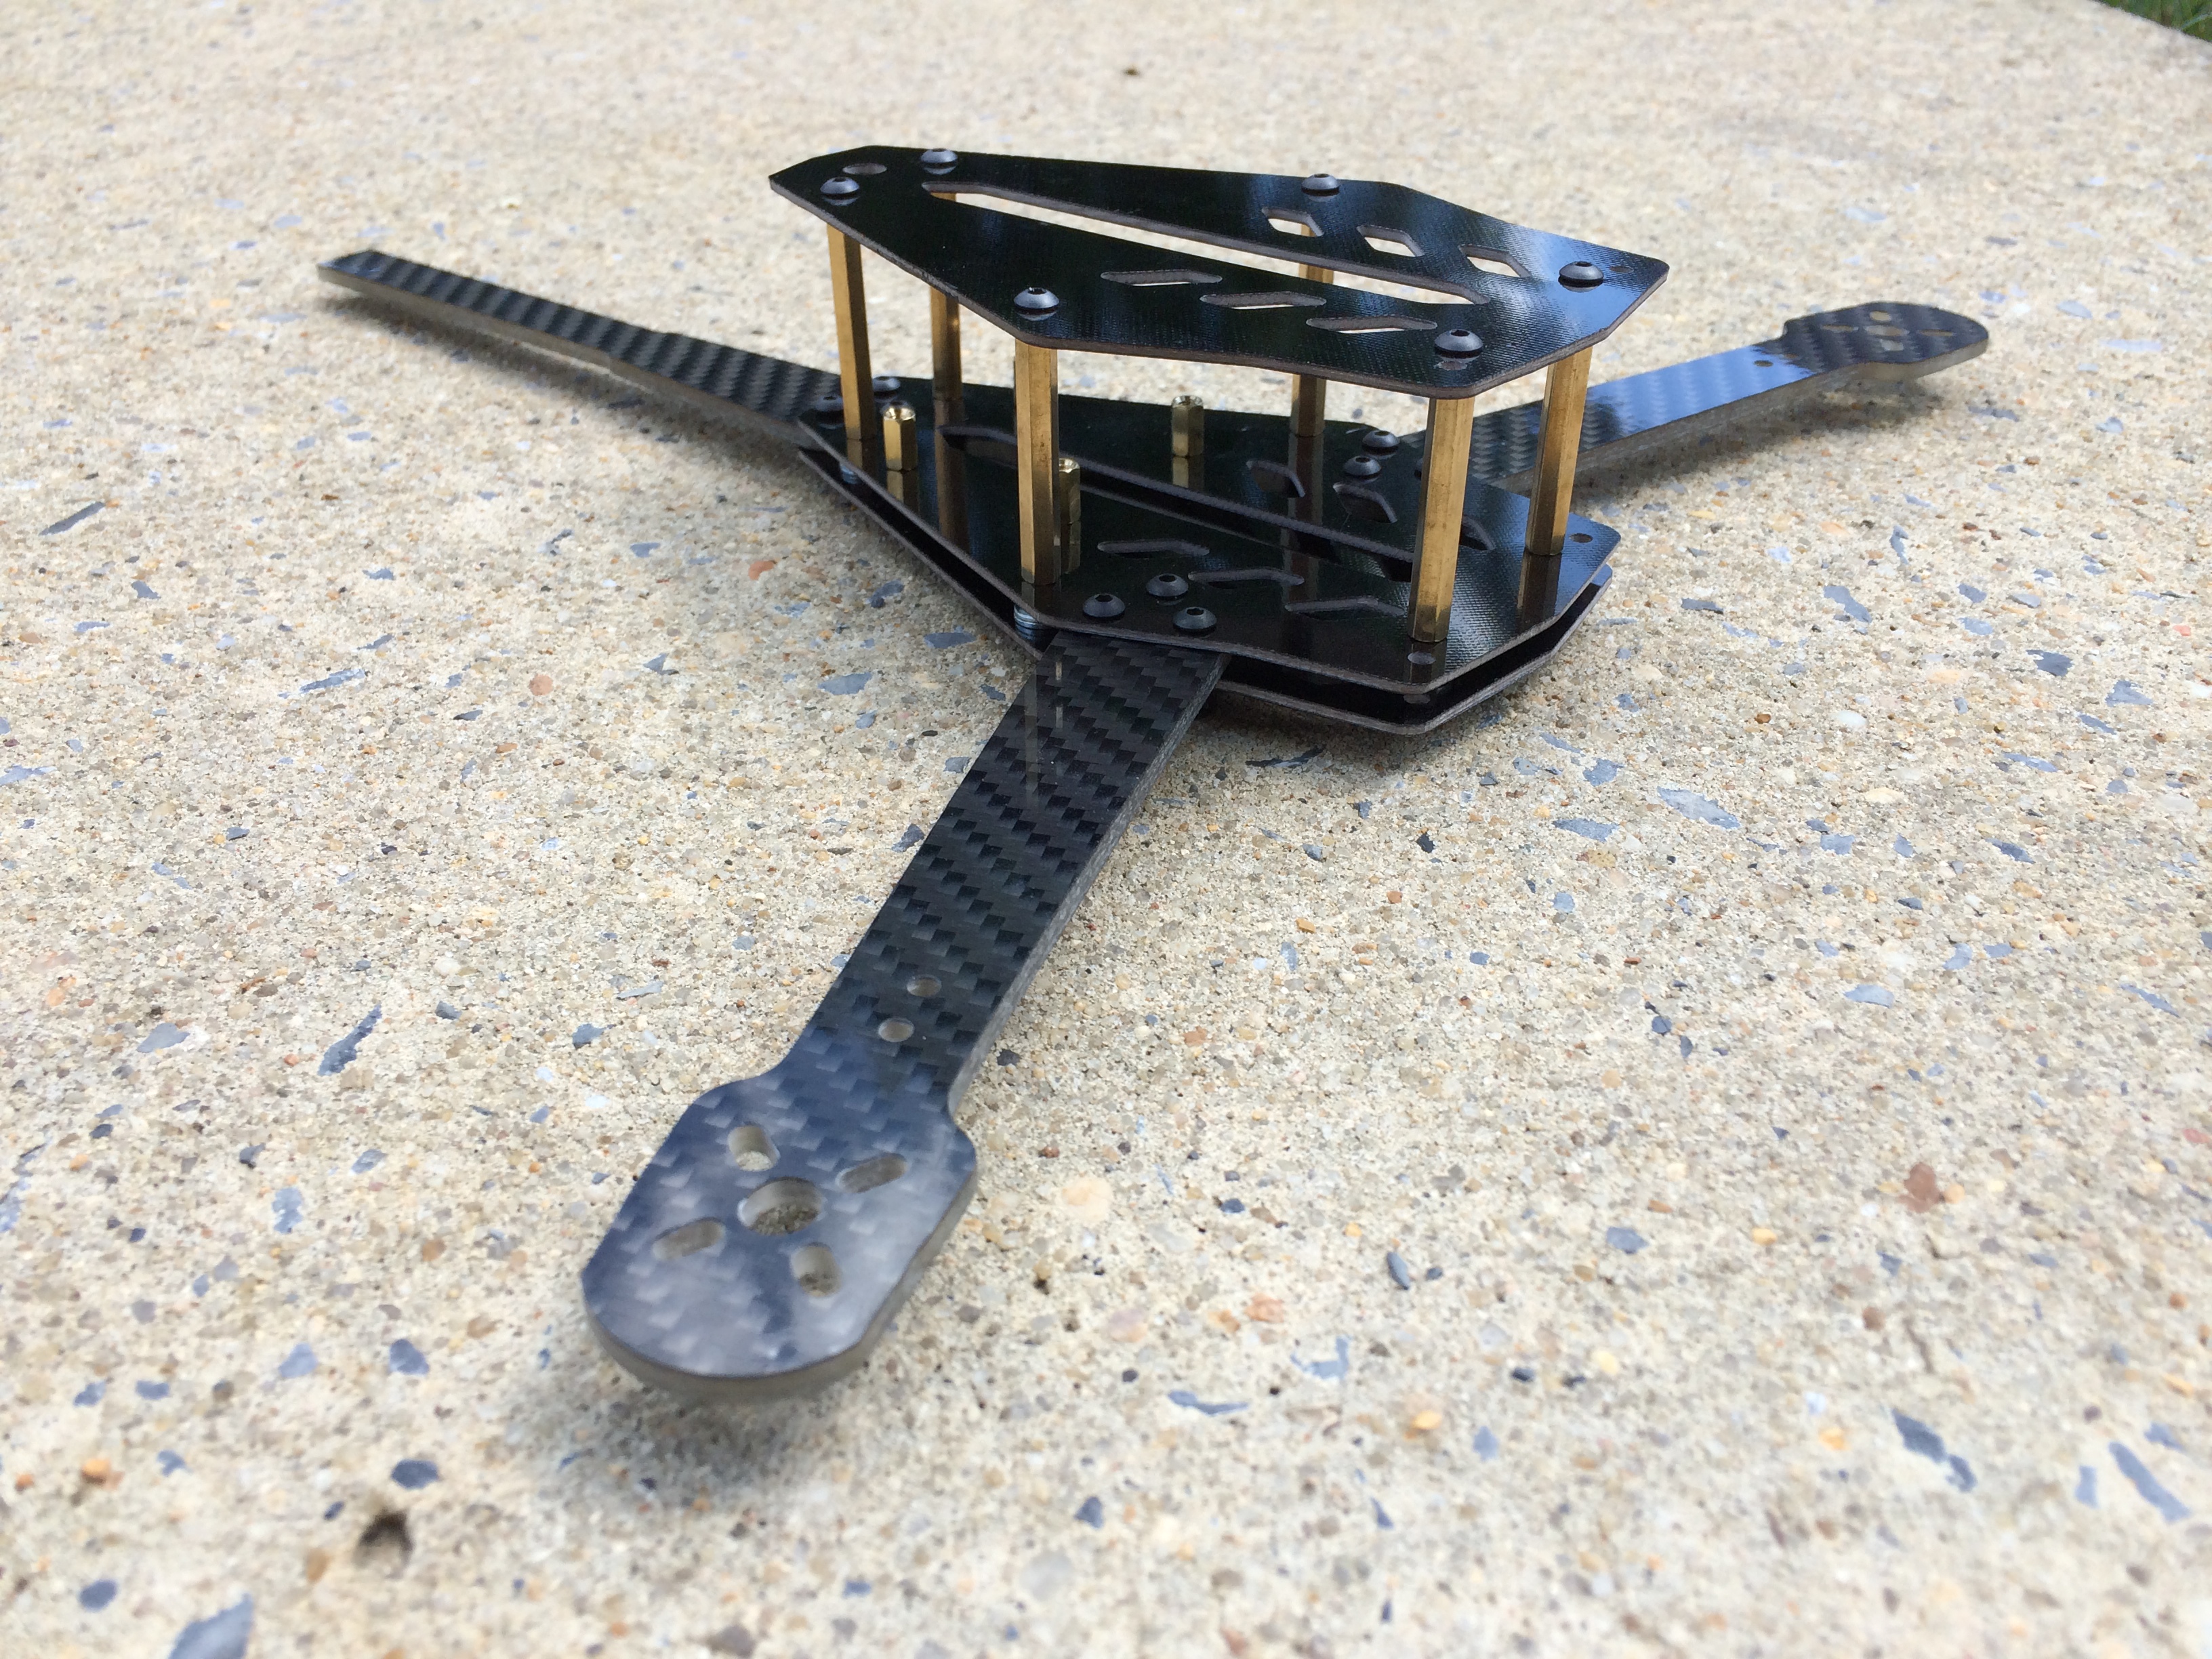
MinTri Frame from Nick Caldwell
The new frame kit from Nick is a rock solid build platform. It’s everything you want in a mini multiroter: stiff, well designed, and still plenty of room even for the small size.
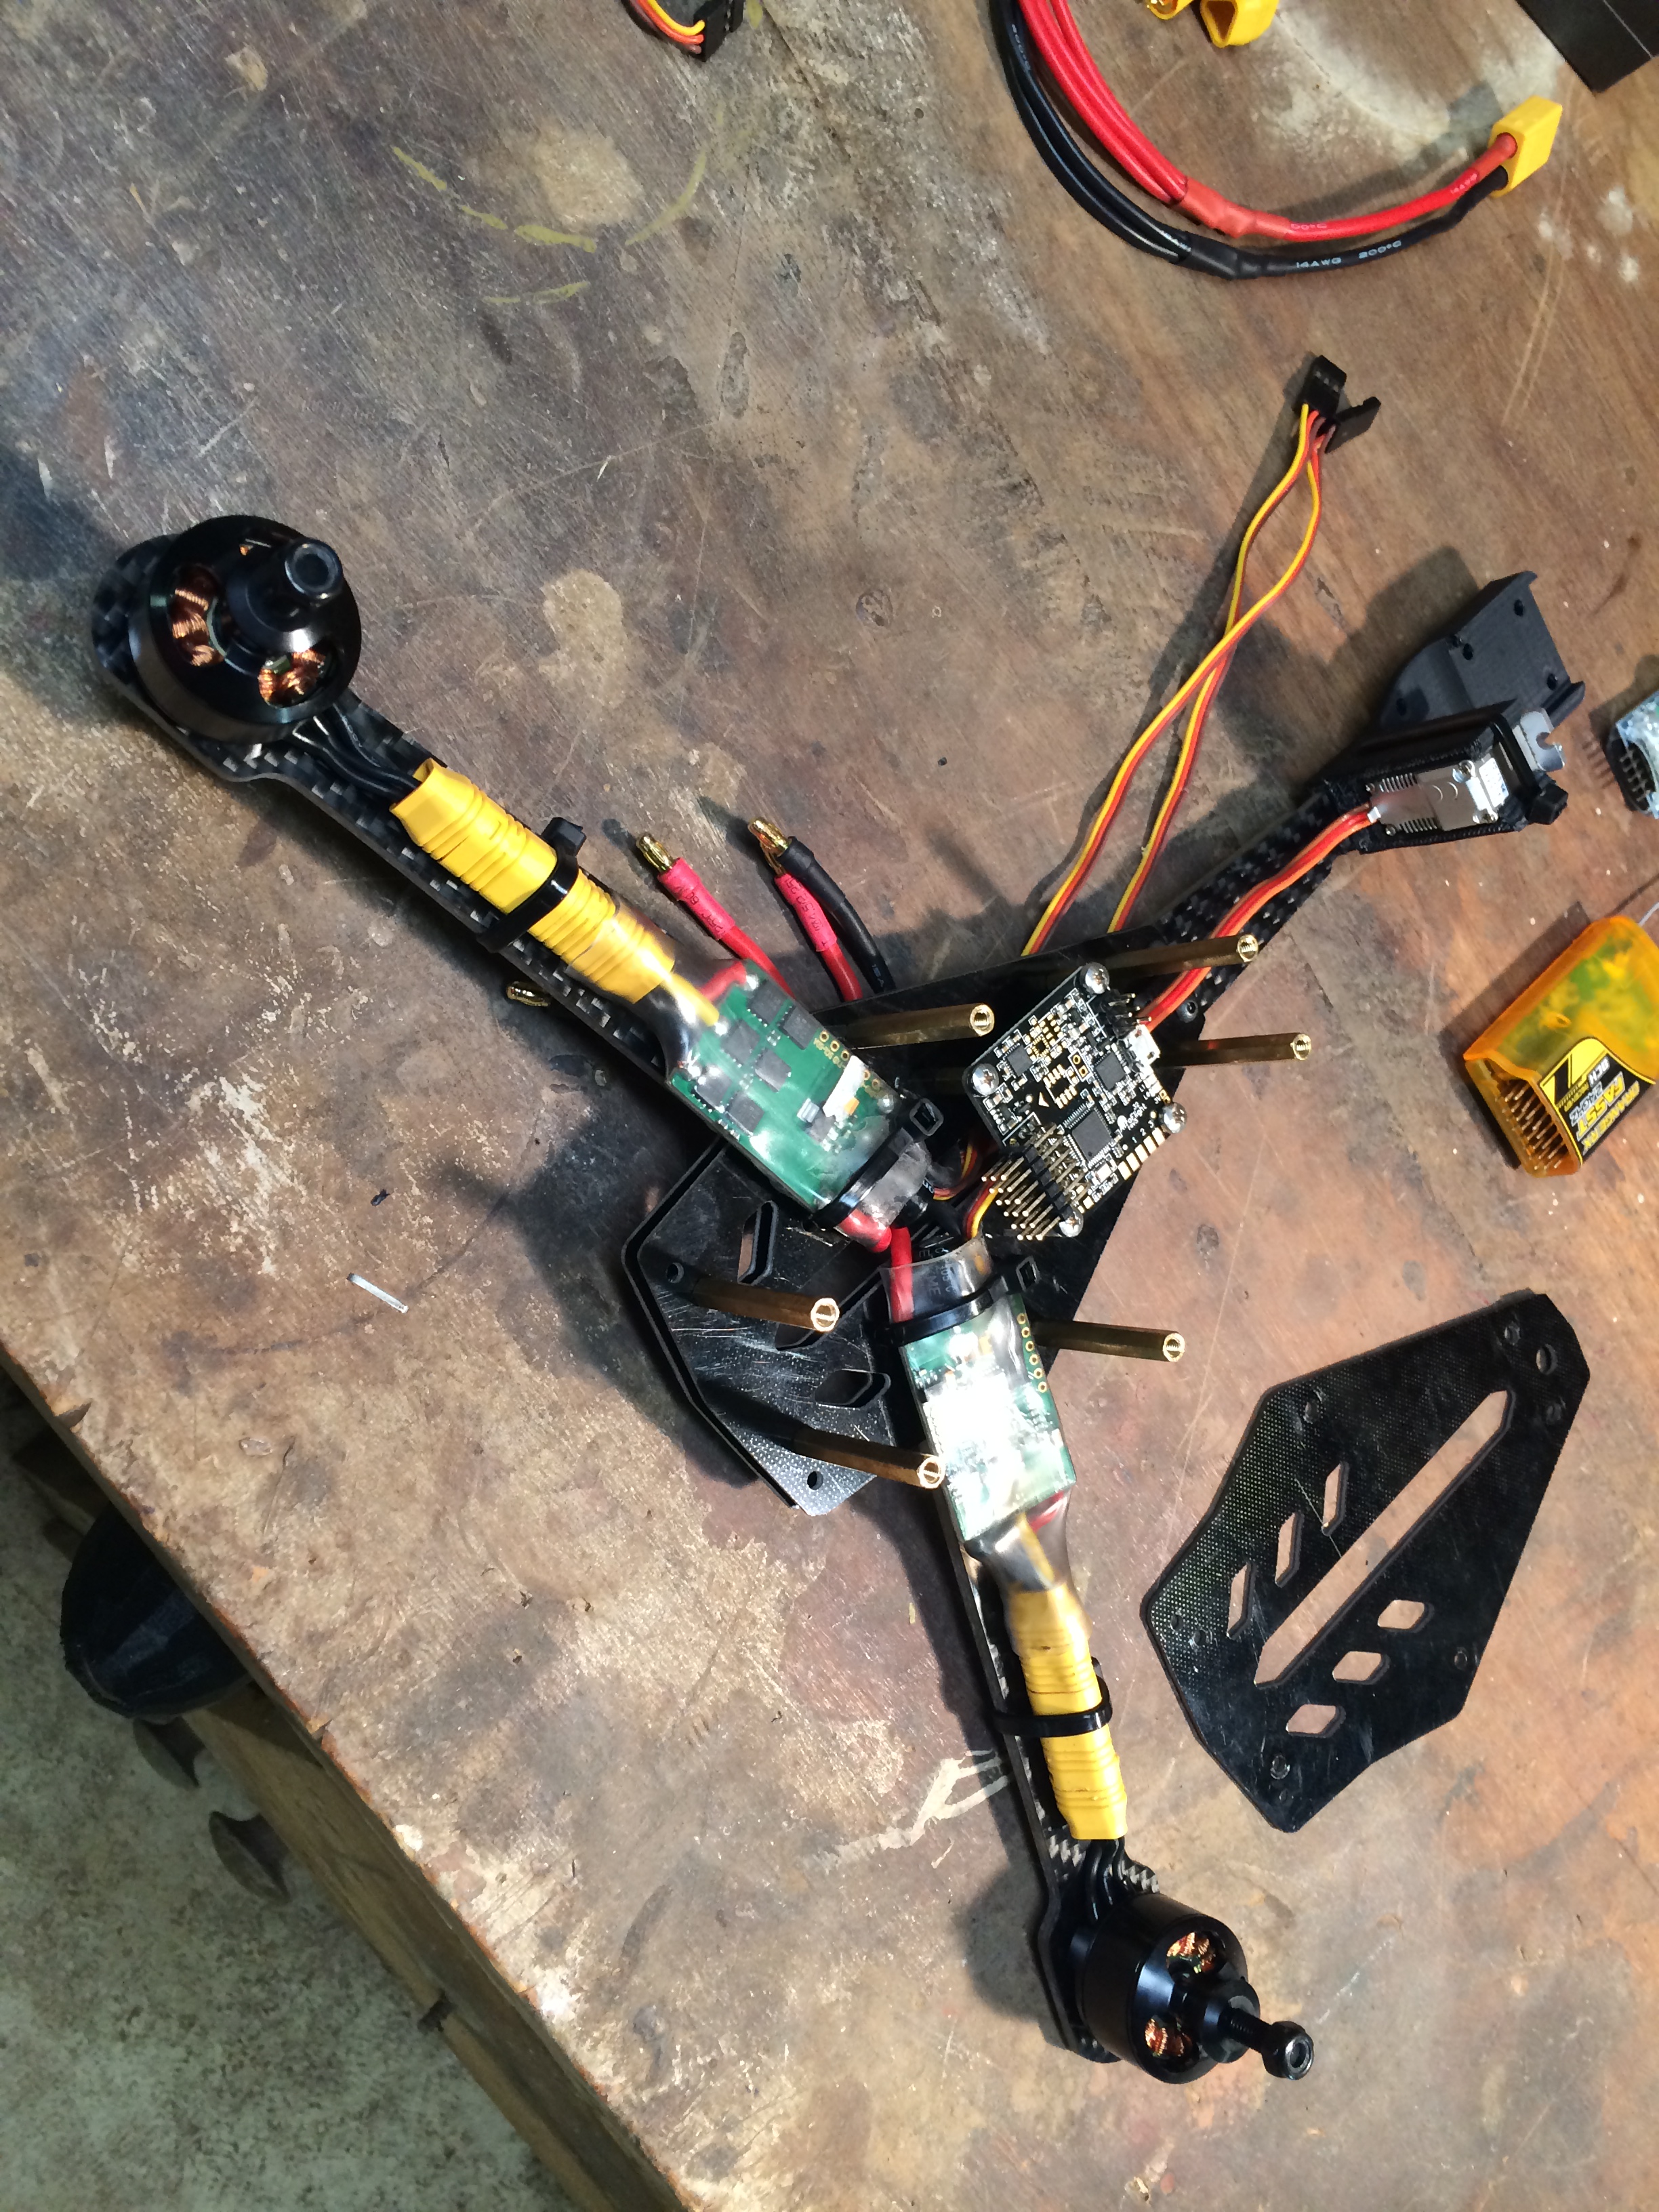
From my experience with my Blackout Mini H Quad I had a pretty good idea of what components to string together to build a super fast and agile FPV multirotor. I started with 3 killer Cobra CM-2208/20 motors. These 2000 kv motors will easily spin a 6×4 prop on a 3-cell at under 12 amps. This wicked combination should result in 50-65 mph speeds and easily 10-12 minute flight times.

3 Pole Motor / ESC Connector
I also took this opportunity to checking out these new 3 Pole Motor / ESC Connectors from HK. They allow for easy connect/disconnect of the motor and esc. They also help clean up the build. The only downside is you have to be absolutely sure of your connections before soldering. If the poles are backwards and your motor runs in the opposite direction than intended you’ll be de-soldering and starting again. Otherwise I love the clean look of these connectors. I will defiantly be thinking of adding them to future builds.
For ESC’s I used three 20 amp Afro ESC‘s also from HK. They are probably a bit overkill but I had them just sitting in the shop. These run the SimonK Firmware and should be efficient and with the high clock speed they’ll have great throttle reaction time.
BackyardRC Tilt Motor Mount Version 1
After mounting up the front two motors I turned to the tilt mechanism and rear motor mount. The original BackyardRC Tri Tilt Motor Mount was great and it has gained some traction over on thingiverse and elsewhere a like. At the time of this post it has been viewed nearly 3000 time, downloaded 325, and had two other members print and share!! But truth be told it had some limitations. The largest being that it required additional nose gear mounts to be modified to create the tilt action mechanism.

Evolution of BackyardRC’s Tri Tilt Motor Mount
So this felt like an prefect time to do a little redesign to make a self-contained all-in-one printable mount. After a few hours working in solidworks I came up with the BackyardRC MiniTri Motor Mount.
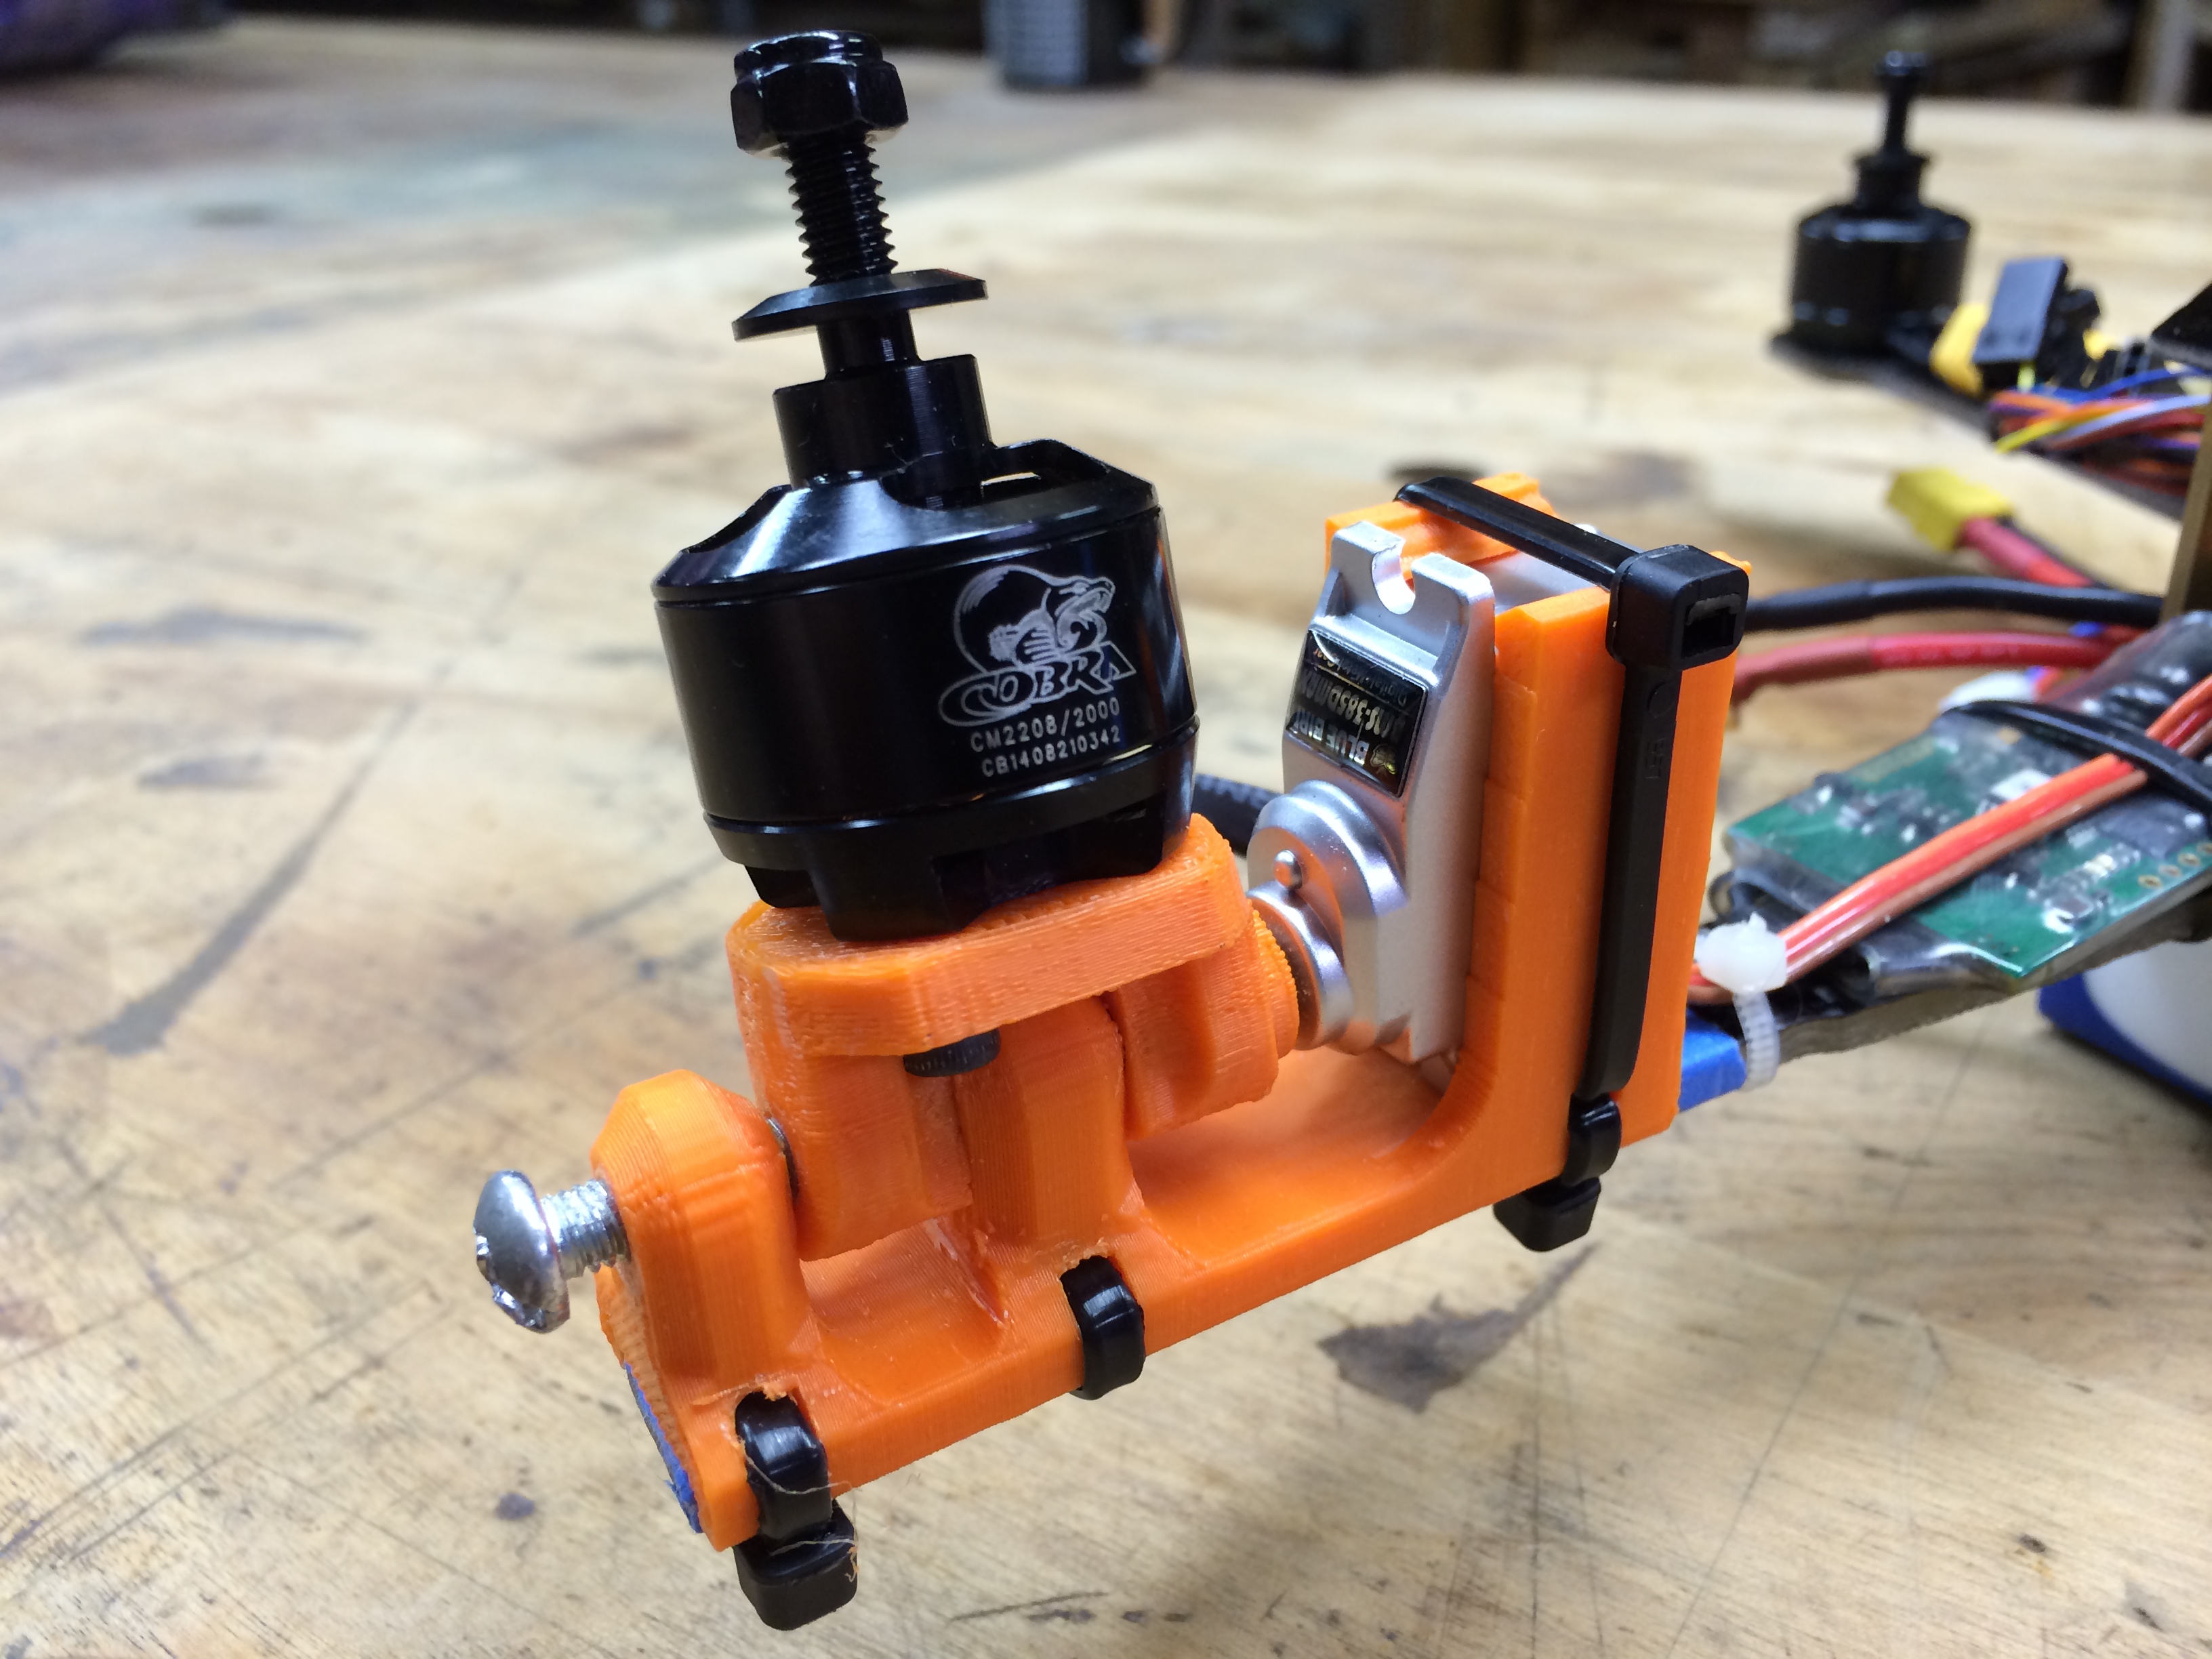
BackyardRC MiniTri Motor Mount
Made completely on the same principles of the original but with a ton of new enhancements. Optimized motors with a 16mm/18mm bolt pattern any of your most common and favorite motors will bolt right up. The main tilt shaft is a #10 by 30mm bolt (1.25 inches) found at any hardware store. Printed in solid ABS plastic it is rock solid. Easily mounts to any 1/2 boom with three zip ties. It also uses the trusty and powerful BMS-385DMAX Digital Servo with metal gears. I’ve been using this servo with my large tricopter spinning 10×3.5 props on 900kv NTM motors and never had a problem. It should handle the little 6×3 props with ease.
While the focus of my redesign was around the MiniTri I’ll be designing top plates for all sizes and bolt hole patterns shortly. But more on that on another day.
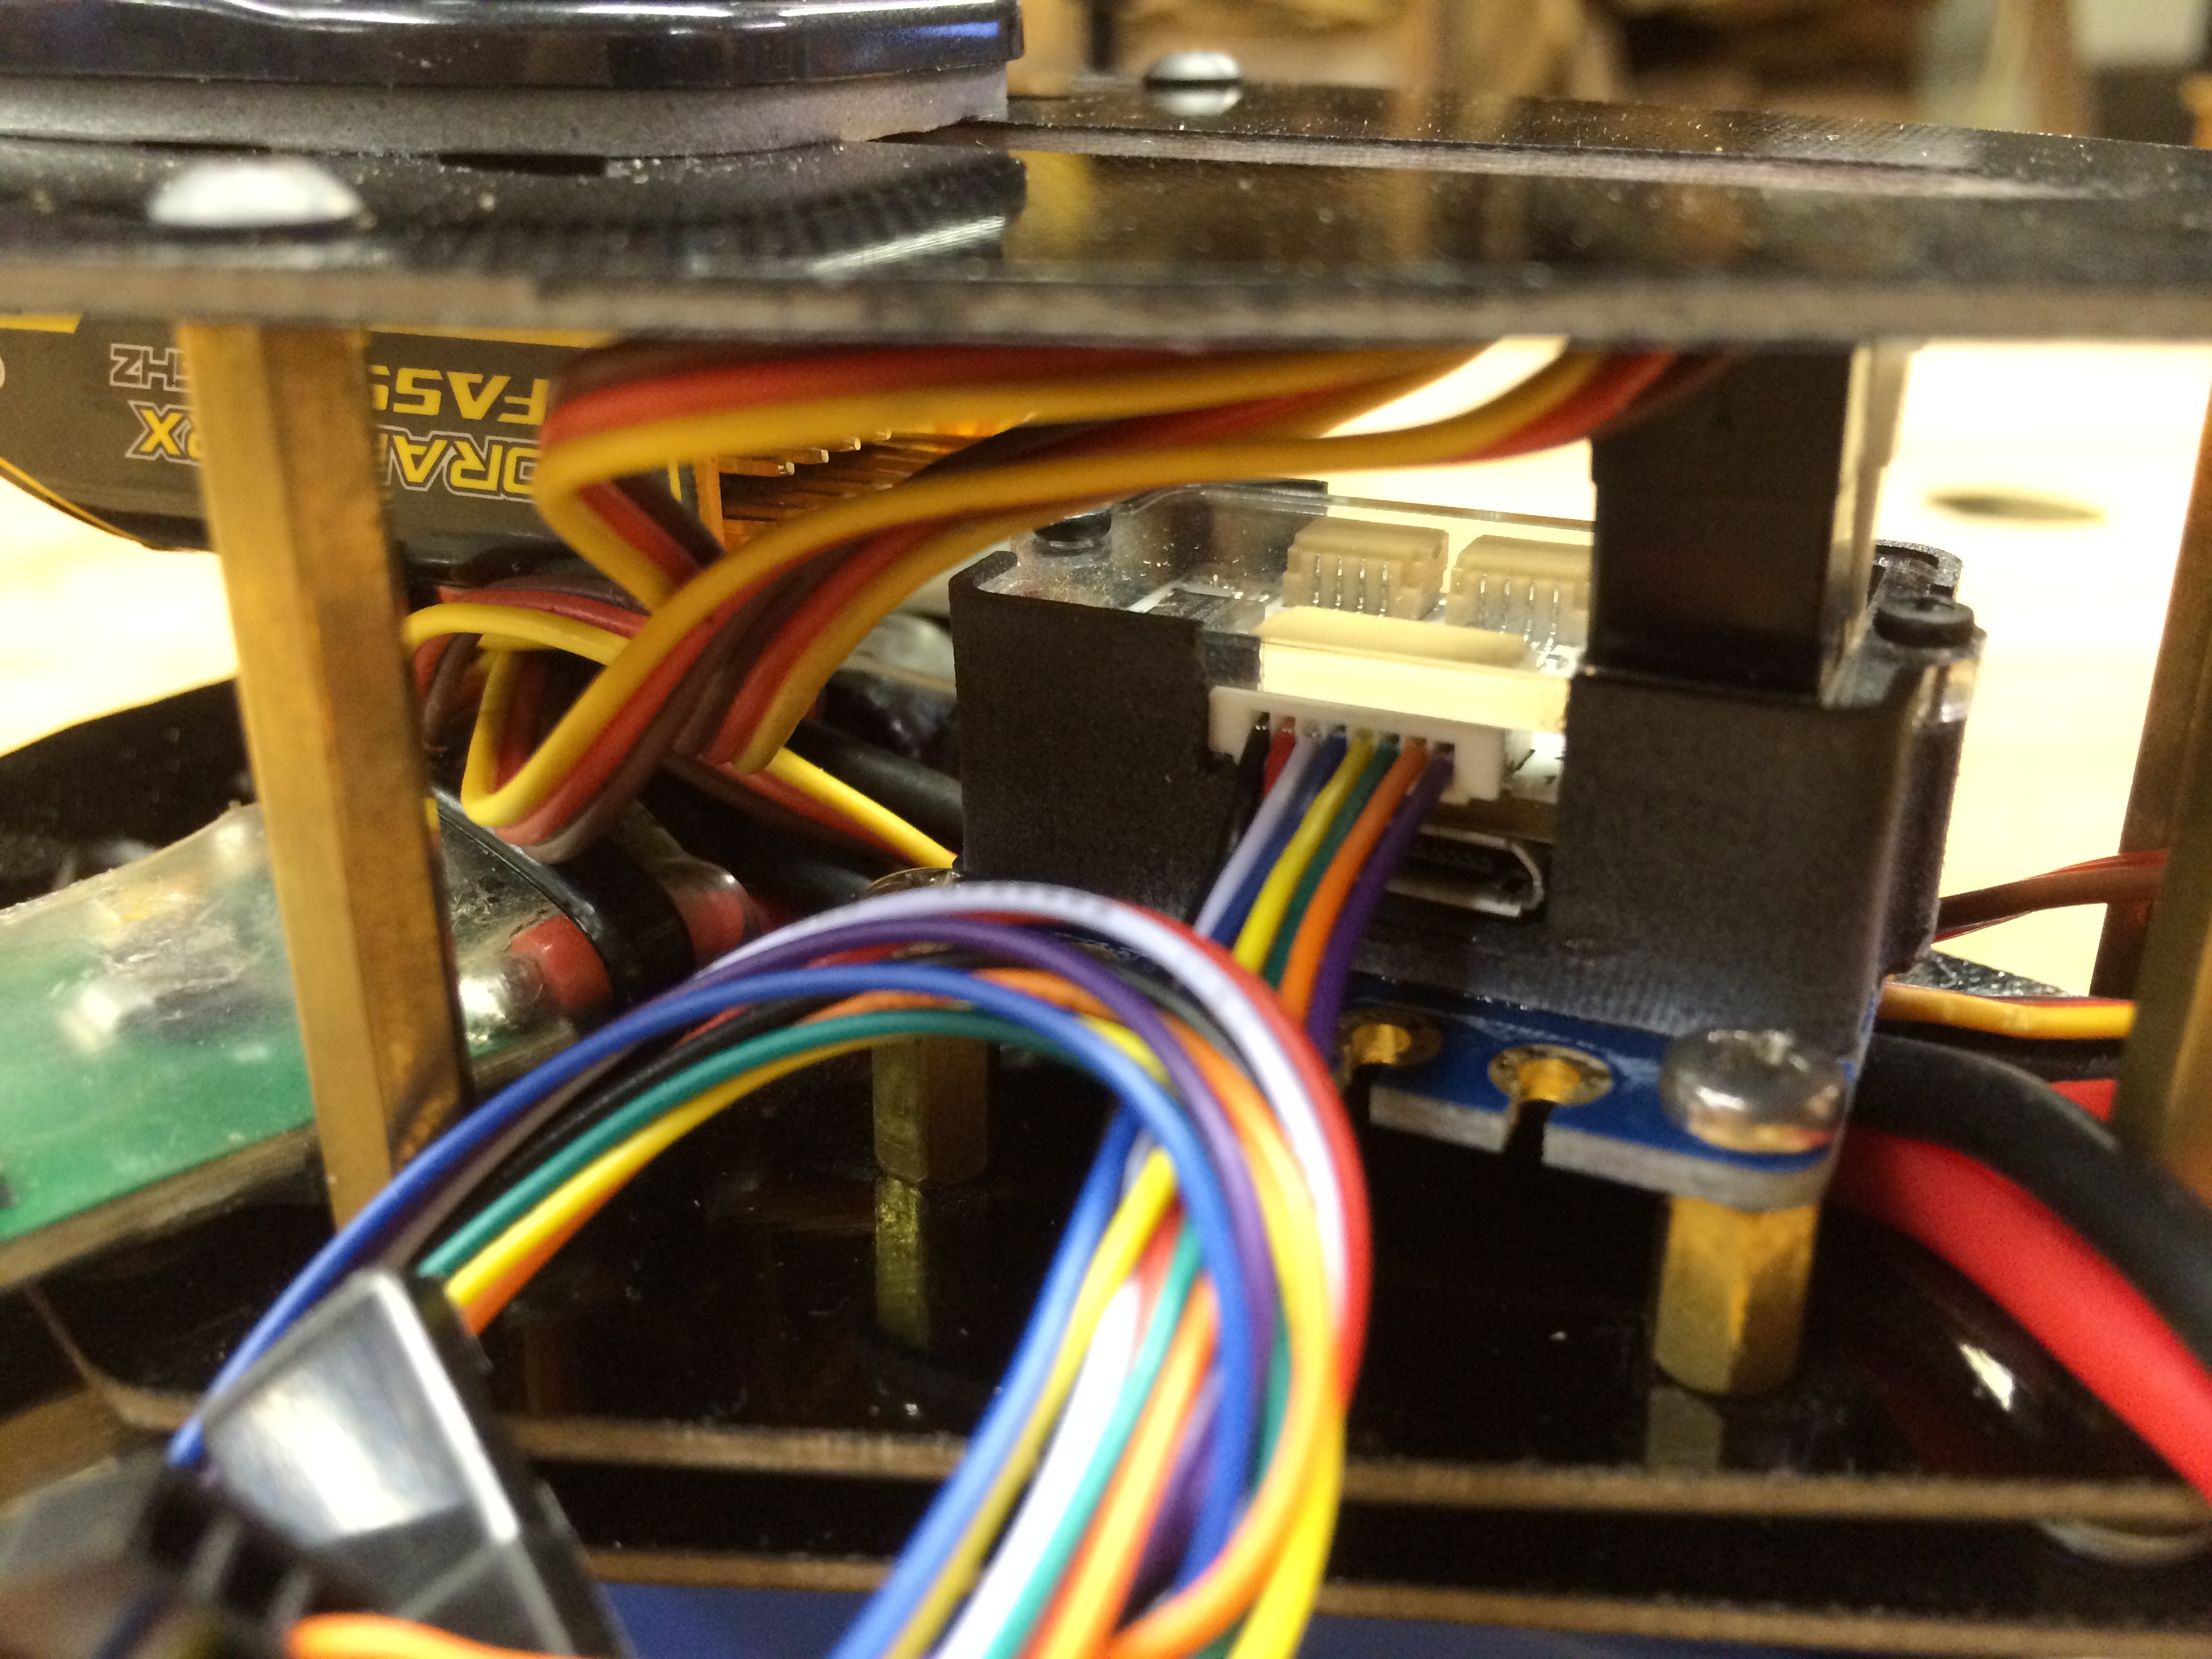
Atom CC3D
Moving on from the motors I decided to stay in the spirit of mini things and picked up the new Atom CC3D flight controller from GetFPV.com. I’ve been running the standard CC3D on my mini H quad and it is awesome! This will be the first build I try out the Atom but as the site claims it is all same functionality in the footprint of less than 1/2 of it’s bigger brother. I finished up the day by mounting the go-pro case on the top and mocking up where the FPV gear will mount.

MiniTri is almost Done!!
Overall the build is coming along well. Nick’s frame kit has proved to be a solid foundation for a sleek clean build. I can’t wait to get this little guy tuned and in the air. I really hope Nick takes this kit beyond the prototype phase and releases it to the masses because it is a thing of beauty!

MiniTri Goodness
Only a few steps remain before I start some early test flights. With any luck I will find 2-3 hours tomorrow and finish up the build!! Then it’s time to go flying!!
-Miles
Parts List:
MiniTri Frame Kit (x1)
Cobra CM-2208/20 2000 kv motors (x3)
3 Pole Motor / ESC Connector (x2)
Afro ESC 20Amp Multi-rotor Motor Speed Controller (x3)
BMS-385DMAX Digital Servo (x1)
Atom CC3D Flight Controller (x1)
Gemfan 6×3 Propeller (x1 set)
ZIPPY Flightmax 2200mAh 3S1P 40C (x1)
RC Receiver of your choice (x1)
My FPV Setup:
Go-Pro 3+ Camera (x1)
Super Slim GoPro 3 A/V Cable (x1)
ImmersionRC 5.8Ghz Audio/Video Transmitter (x1)
ImmersionRC 5.8GHz Circular Polarized SpiroNet Antenna (x1 set)
SMA 90 Degree Antenna Adapter (x1)
Fatshark Goggles (x1)
September 29, 2014 – Blackout Crash
Posted by on October 1, 2014
Yesterday I took the Blackout quad for a flight at the new house… but I found a tree instead. I simply misjudged the pass and caught a tree with a fair amount of speed. The hard impact only broke a bunt of the plastic bolts and one prop. After about 10-15 minutes of work it was back up in the air.
Check out the footage of the crash:
-Miles

Recent Comments